

Exercisers tend to fall into two categories: those who repeat the same workout every day and those who perform wildly different workouts each time they hit the gym.
Both approaches are infinitely better than no exercise at all. But if you want to squeeze all you can out of your workouts — to feel, look, and perform your best — you need what trainers call periodization.
This approach to fitness programming involves workouts that build systematically on each other, nudging you toward the best condition of your life. That’s what this program does.
In 2017 we published a six-part series called “Strong, Fast & Fit,” designed to help readers make significant progress toward their fitness goals in six months (you can find it here). Readers who completed it achieved excellent results — and wanted more. So we listened and are back with Part II.
From now through the June 2020 issue of Experience Life, you’ll see a new monthlong fitness plan, each one designed to push you even further. Along the way, we’ll offer tips on nutrition, mobility, and lifestyle that will support your workout efforts.
I’ll be your guide. Since 2003 I’ve coached an assortment of clients — working parents, college athletes, teenagers, older adults, and many others — on how to get fitter and move better. I’ve written two books and dozens of articles on fitness. And I’ve consulted and interviewed some of the best coaches and experts in the world.
I juggle my passion for fitness with the demands of work and family every day, so I understand that time is always scarce and resources are often limited. In this plan, there’s a reason for every rep.
Stick to the plan, and by June you’ll be stronger and fitter than you’ve been in a long time — possibly ever.
Let’s dive in.
Month 1: Learning the Ropes
Your first month consists of two strength workouts, A and B. You’ll exercise on three nonconsecutive days a week — Monday, Wednesday, and Friday, say, or Tuesday, Thursday, and Saturday — alternating between the workouts. Stick to these parameters: three times per week, alternate workouts, at least one day of recovery between sessions. Feel free to change the days you work out from week to week.
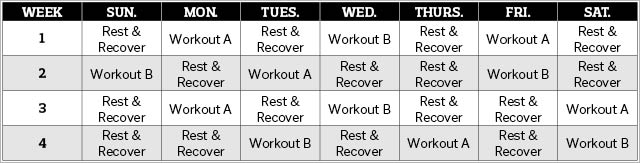
This month, your workout schedule might look like this:
| Week | Sun. | Mon. | Tues. | Wed. | Thurs. | Fri. | Sat. |
| 1 | Rest | Workout A | Rest | Workout B | Rest | Workout A | Rest |
| 2 | Workout B | Rest | Workout A | Rest | Rest | Workout B | Rest |
| 3 | Rest | Workout A | Rest | Workout B | Rest | Rest | Workout A |
| 4 | Rest | Rest | Workout B | Rest | Workout A | Rest | Workout B |
You’ll focus on perfecting your form on basic movements like squats, rows, and presses this month. To that end, use less weight than you think you can handle the first two or three times you perform each workout. The last two weeks of the month, increase the weight you use so you finish each set two or three reps shy of exhaustion.
Always begin with a warm-up — see “Warm-Up Drills,” below. Each workout consists of four main exercises; similar movements are paired (1A and 1B; 2A and 2B). Perform a set of the first move, rest, then perform a set of the second before returning to the first. Continue alternating sets in this manner until you’ve completed all the sets of both moves.
Workout A
| Exercise | Sets x Reps, Weeks 1-2 | Sets x Reps, Weeks 3-4 |
| 1a. One-Arm Dumbbell Row | 2 x 15/side | 3 x 12/side |
| 1b. Goblet Squat | 2 x 15 | 3 x 12 |
| 2a. TRX Pushup | 2 x 15 | 3 x 12 |
| 2b. Side-Lying Clamshell | 2 x 8/side | 3 x 10/side |
Workout B
| Exercise |
Sets x Reps, Weeks 1-2 |
Sets x Reps, Weeks 3-4 |
| 1a. TRX Inverted Row |
2 x 15 |
3 x 12 |
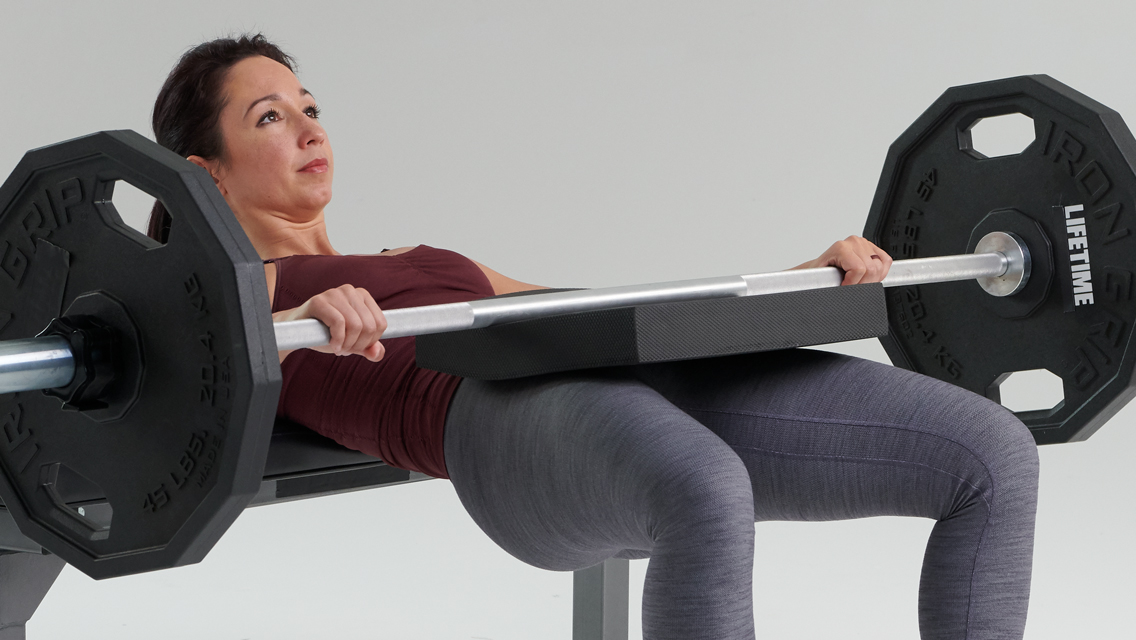
| 1b. Barbell Hip Thrust |
2 x 8 |
3 x 10 |
| 2a. Landmine Press |
2 x 8/side |
3 x 10/side |
| 2b. Static Lungr |
2 x 8/side |
3 x 10/side |
Warm-Up Drills
Prior to your workouts on exercise days — and any day during the rest of the week — perform the following mobility and activation drills.
Yoga Plex
- Assume a pushup position: your hands and the balls of your feet on the floor — both at shoulder width — body straight from your heels to the crown of your head.
- Keeping your back flat and your arms and legs straight, lift your hips as high as possible, assuming the downward dog posture. Hold for two deep breaths.
- Step your right foot forward, placing it on the floor just to the right of your right hand.
- Straighten your left leg and sink your hips to the floor as much as possible. Hold for two deep breaths.
- Lift your right hand off the floor, extend it up and back and reach for the ceiling. Pull your right shoulder blade onto your back. Lengthen your spine, straighten your back leg, and hold for two deep breaths.
- Return your right hand to the floor and step back to downward dog. Hold for two deep breaths.
- Repeat the sequence above, this time stepping your left foot forward and rotating your left arm back, breathing deeply in each posture. After you have completed the whole series on both sides, return to a standing position, then repeat, running through the entire yoga plex a total of four to five times.
Vacuum Plank

- Assume the pushup position as described above, placing your forearms on the floor instead of your hands.
- Rotate your palms down and draw your elbows toward one another so that your forearms are parallel on the floor.
- Slide your forearms forward so that your upper arms form about a 45-degree angle to the floor.
- Round your back toward the ceiling as much as possible and pull your belly button toward your spine holding them there throughout the movement.
- Hold for a total of 60 seconds, taking as few breaks as necessary.
Bird Dog
- Assume an all-fours position on the floor, hands directly below your shoulders, knees directly below your hips.
- Slowly extend your right leg behind you as if kicking something with your heel, keeping your toes pointed directly toward the floor.
- Simultaneously extend your left arm forward, straight and parallel to the floor.
- Hold for five seconds, slowly lower your right leg and left arm, then repeat the sequence using your left leg and right arm.
- Perform three to six reps per side. (See “BREAK IT DOWN: The Bird Dog” to learn how to refine your movement.)
Exercises
One-Arm Dumbbell Row
- Spread your feet wide and bend forward at the hip joints, bracing your left hand on the bench with your elbow straight and your back flat, allowing the dumbbell in your right hand to hang straight down. This is your starting position.
- Without shrugging your shoulder toward your ear, slowly retract your right shoulder blade and pull your right elbow back and up as high as possible, keeping your elbow close to your side throughout the movement.
- Pause and reverse the move, returning to the starting position.
- Repeat for reps, then repeat on the other side.
Goblet Squat
- Stand holding the “horns” of a single kettlebell just below your chin. Tuck your elbows in and raise your chest high. Step your feet out to slightly wider than shoulder width, toes pointed out slightly. This is your starting position.
- Keeping your chest up, your gaze forward, and your lower back in its natural arch, bend your knees and hips, widening your knees wide and dropping your hips until the tops of your thighs are parallel to the floor.
- Pause and return to the starting position.
TRX Pushup
- Extend the handles of a TRX (or equivalent) until the handles are about waist-high. Hold the handles and assume a pushup position: hands and feet slightly wider than shoulder width, balls of your feet on the floor, arms locked out and body straight, heels to the top of your head. This is your starting position.
- Keeping your body straight and your head in a neutral position, simultaneously bend your arms and retract your shoulder blades until you feel a deep stretch in your chest muscles — or as far as you can without losing good form.
- Reverse the movement, pushing yourself back up to the starting position.
- To make the move easier, lengthen the straps of the TRX or walk your feet backward.
- To make the move more difficult, shorten the straps or walk forward.
Side-Lying Clamshell
- Lie on your left side with your left forearm flat on the floor, your left upper arm vertical, your knees pulled toward your chest and bent 90 degrees (your knees and feet should be “stacked”— right knee and right foot directly on top of left knee and left foot).
- Press your left forearm into the floor, raising up your hips (at this point, only your left forearm, hand, and lower leg should touch the floor).
- Push your hips forward so that your body forms a straight line from your knees to the top of your head.
- Keeping your feet stacked, raise your right knee away from your left as high as possible.
- Pause for a one-count, reverse the move, and repeat for the appropriate number of reps.
- Turn and repeat the same number of reps on the opposite side.
(Try these other variations of the clamshell to make it more or less challenging.)
TRX Row
- Standing a few feet behind the anchor point for a TRX (or equivalent), raise the handles to chest height and walk backward until the straps are taut.
- Keeping your arms extended, walk your feet forward until your body forms about a 45-degree angle to the floor.
- Keeping your body straight, head to heels, and your head in a neutral position relative to your spine, simultaneously bend your arms and pull your shoulder blades back, lifting your chest as high as you can toward the anchor point.
- Pause, slowly reverse the movement, and repeat for reps.
- To make the move easier, start with your feet farther back.
- To make the move more difficult, start with your feet farther forward.
Barbell Hip Thrust
- Sit on the floor and position your upper back against a flat bench.
- Roll a loaded barbell up your legs to the crease of your hips and bend your knees so your feet are flat on the floor. (Place a rolled-up yoga mat between your hips and the bar, if needed for comfort.)
- Hold the bar in place and press your hips into the air until they are fully extended. Your back should rest on the bench.
- Lower your hips and the barbell back down, keeping your upper back pressed against the bench throughout the movement.
- Alternatively, use the hyperextension machine.
Landmine Press
- Place an Olympic bar in the sleeve of a landmine setup, load with a light weight, and stand facing the end of the bar.
- Lift the free end of the bar to shoulder height with your right hand (your palm should face inward).
- From a shoulder-width, parallel stance, press the bar overhead for the appropriate number of reps, then switch hands and repeat the exercise on your left side.
Static Lunge
- Stand with your feet together and your torso upright and take a long step forward with your right foot.
- Keeping your torso upright and your gaze forward, slowly bend both legs until your left knee comes close to the floor.
- Pause and reverse the movement, returning to the right-foot-forward position, and repeat.
- Complete all reps with your right foot forward before switching to your left.
- Use dumbbells for additional resistance if necessary.
Outside the Gym
Fitness training is a two-step process: working out and recovering. This is your recovery-enhancing homework for month 1:
1. Drink more water. You’ve heard this more times than you can count, but make this the month you do it. Go for eight to 10 cups every day.
2. Prioritize protein. Protein is essential for both muscle building and fat loss. Choose between high-quality animal sources (poultry, dairy, beef, pork, eggs) and vegetarian sources (tofu, lentils, beans) at least three times daily.
3. Walk. Get a jump on the cardio workouts to come in future months by walking — 20 to 60 minutes at a stretch, two to five times a week. Don’t worry about distance, steps, pace, or intensity. Walk by yourself or with others, ideally in a natural setting whenever you can.
*Learn the moves for month 1 of our “Strong, Fast & Fit: Part II” six-month workout program with this video.
This originally appeared as “Strong, Fast, and Fit: Part II” in the January/February 2020 print issue of Experience Life.


Comments (0)