


The best way to finish strong is to start strong. This golden adage applies to many aspects of life, but it rings especially true when it comes to exercising: A proper setup is essential for maximizing the benefits of any move and can determine its ultimate efficiency and efficacy.
In other words, start strong to get stronger.
“The setup of your exercises impacts what muscles get loaded, how effective the training is, and the relative risk of injury with the movement,” explains Samuel Spinelli, DPT, CSCS, a physical therapist, strength coach, and cofounder of Citizen Athletics.
Your starting position determines the direction your body — and any weight you’re lifting — will travel throughout the movement. A strong setup ensures your body follows the most efficient path for targeting the muscles or skills you want to focus on, no matter how much weight you lift.
The more efficiently you perform an exercise, the more work you’ll be capable of doing, whether that’s how much you’re able to lift or how many sets and reps you can complete. This leads to greater adaptations from the exercise in the long run, which means better performance overall.
It also allows your muscles, joints, and connecting tissues to work optimally while providing another important benefit: “In many cases, being intentional about getting into a proper setup position alleviates a lot of injury potential,” says Konnor Fleming, signature coach development lead at Life Time in Edina, Minn.
While there is no “perfect” form that works for every person, there are guidelines that can help you find what works best for your body and goals. The following strength exercises have tricky setups, but these expert tips can help you secure a strong starting position.
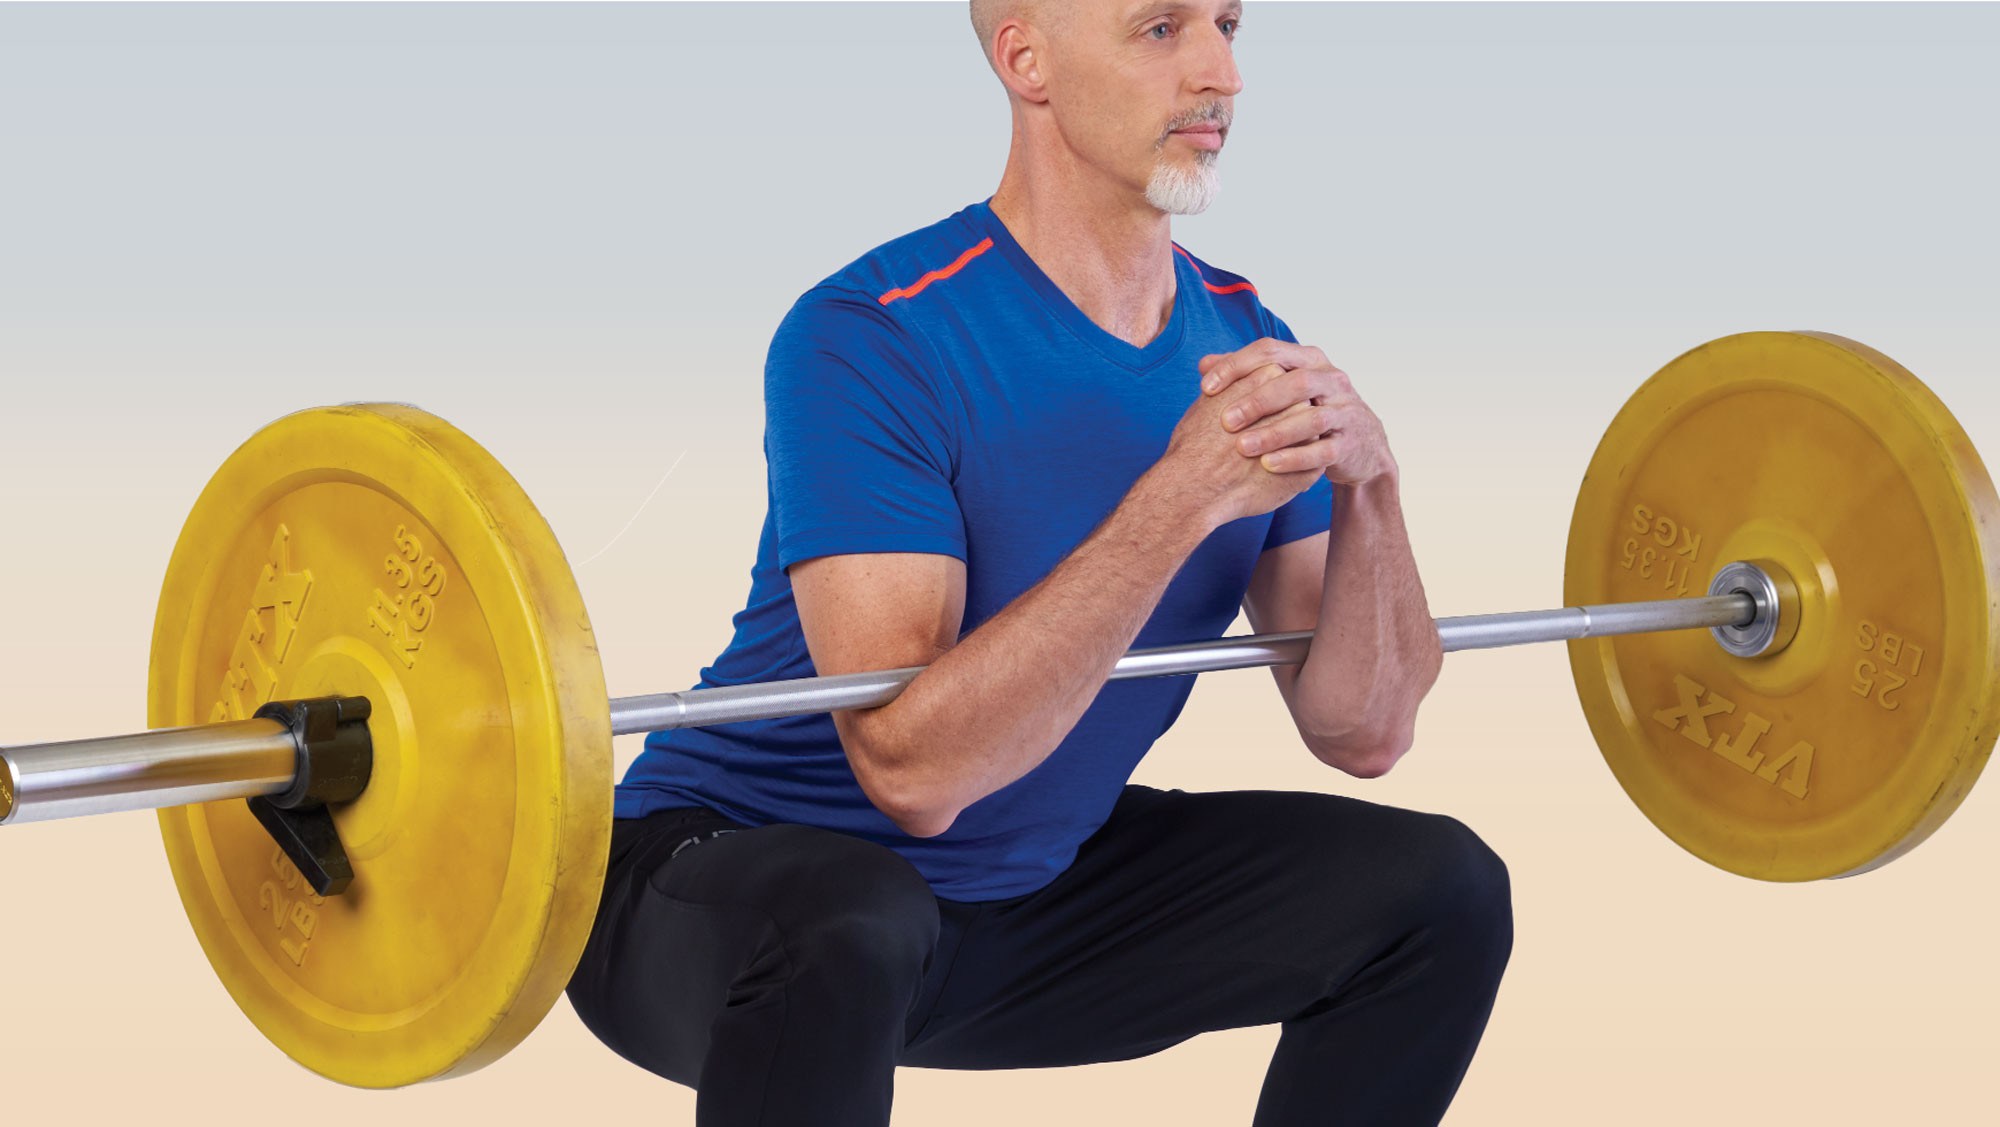
Barbell Back Squat
This exercise works muscles around multiple joints in the lower body, building strength and muscle in your quads, glutes, and hamstrings.

Common Barbell Back Squat Set Up Mistakes
J-hooks too high or too low.
One of the first mistakes people make when setting up for the back squat is setting the J-hooks, which hold the barbell on the squat rack, too high or too low. If you set them too high, you’ll have to rise onto your tiptoes to unrack the bar. Too low and you’ll have to do a half-squat to get the bar out of the rack for your first rep, Gaudreau says.


Feet too close together.
Placing the feet hip width apart tends to be too narrow for most people. A too-narrow stance can inhibit the ability to squat through a full range of motion (lowering the hips until the thighs are at least parallel to the ground) and potentially cause people to lift their heels rather than pressing through their full feet.


Barbell on the neck.
Positioning the barbell at the base of the neck can put pressure on the delicate bones of the cervical spine, causing neck discomfort and pain, says Gaudreau.


How to Set Up for the Barbell Back Squat
Position J-hooks at armpit-height.
For most people, this is the height that allows them to unrack the bar without rising onto their tiptoes or wasting energy by doing a half-squat, Gaudreau notes.
Play with your foot position.
Start with your feet shoulder width apart and your toes turned out about 10 to 15 degrees. This tends to be the most comfortable squat stance for most people because “it starts to naturally open the hips up, making it easier for people to sit deeper into the squat,” says Fleming. From this position, experiment with micro changes to your stance — slightly wider or narrower; toes turned out slightly more — to find what works best for you.


Make a shelf for the barbell.
Instead of letting the bar rest on the bony part of the neck, Gaudreau suggests, use your upper-back muscles. “Think about pulling your shoulder blades together a little, and that’s going to give a meaty shelf for the bar to sit [on].”
(See “How to Mix Up the Barbell Back Squat” for additional variations of this move.)


Conventional Barbell Deadlift
This compound movement strengthens the hamstrings, glutes, back, and core. It also trains the hip-hinge pattern, which has functional carryover to other exercises and daily activities.

Common Deadlift Form Mistakes
Upper back disengaged.
It’s important to have tension in the back muscles, including in the large latissimus dorsi. The lats help you lift the barbell off the floor without needing to round your spine or shrug the weight toward your shoulders, says Alison Heilig, a National Academy of Sports Medicine–certified personal trainer, yoga instructor, founder of Miles to Go Athletics in Maryland, and editor in chief of Fit Bottomed Girls.


Hips too high or too low.
As a hinge movement, the deadlift relies heavily on getting your hips in the right position. If you set them up too high, your legs won’t be able to contribute as much to the effort of lifting the weight off the floor, leaving your lower back to pick up the slack. If your hips are too low, you’ll push the bar farther away from your center of gravity, which puts you in a less mechanically advantageous position and makes the weight feel heavier than it is.


Bar too far away or too close.
How closely you set the bar to your body affects how well you’re able to lift the weight off the floor. If the bar is too far away from your body (say, over your toes), it’ll put you in a less effective pulling position and place more pressure on your spine. If the bar is too close to your body (against your shins before hinging), you’ll have to shift your weight back toward your heels to grip the bar. “Unfortunately, that can lead to the toes lifting off the ground, including the big toe, which is important for stability,” says Gaudreau.


How to Set Up for the Deadlift
Imagine squeezing an orange in your armpit.
This cue creates tension in your spine, lats, and upper-back muscles, helping you create more full-body tension and stabilize the spine, says Steph Gaudreau, NASM-CPT, CISSN, a strength and nutrition coach for women over 40. It also keeps your arms — and the barbell — from drifting away from your body.
Set your armpits over the bar.
Finding the proper hip position can be tricky, so Gaudreau recommends a simple trick: Hinge forward to grip the barbell and check that your armpits are directly over the bar.


Line up the bar over your midfoot.
When you look down, the barbell should be over the middle of your shoelaces. In this position, the weight is close to your center of gravity. “When you go to lift [the weight] off the ground, you’ll be able to leverage better and use your legs more than your lower back,” Heilig says.
(See “How to Mix Up the Barbell Deadlift” for additional variations of this move.)


Barbell Overhead Press
Reaching for or lifting objects overhead is commonplace, making this shoulder strengthener a truly functional exercise.

Common Barbell Overhead Press Form Mistakes
Feet too close together.
Your lower body provides a stable base for your arms and shoulders to push from. “If your feet are too narrow, all that does is compromise the stability of the position before you’ve started moving [the weight],” Fleming says. Being even slightly off-balance makes it a lot harder to control the path of the bar when it’s time to press it overhead.


Elbows pointed down.
Gripping the barbell with the elbows pointing to the floor causes the weight to drift forward, notes Fleming. “As soon as that happens, you’re holding the bar with your forearms and biceps instead of supporting the weight on your shoulders.”
Grip too narrow.
Ultimately, your grip position depends on your shoulder mobility and whether you’re targeting the shoulders or triceps (a narrower grip homes in on the triceps). However, many people place their hands closer together than their overhead shoulder mobility allows, leading them to press the barbell forward slightly to compensate.


How to Set Up for the Barbell Overhead Press
Feet hip width to shoulder width apart.
Widen your stance to create a more stable base for the overhead press. You may need to experiment to find your ideal position, but most people settle somewhere between hip width and shoulder width apart, Fleming says.


Point elbows slightly forward.
When you grip the bar, allow the elbows to drift in front of the bar rather than point straight down. This gets the bar to sit on the shoulders and collarbones, giving you a more supportive base position.
Grip with hands shoulder width apart or wider.
For most people, this tends to be the most comfortable grip position, says Tony Gentilcore, CSCS, cofounder of Core Collective, a fitness facility in Brookline, Mass. Aim to keep your wrists as straight as your unique ability allows.
(For more on this move and variations, see “How to Do the Overhead Press.”)


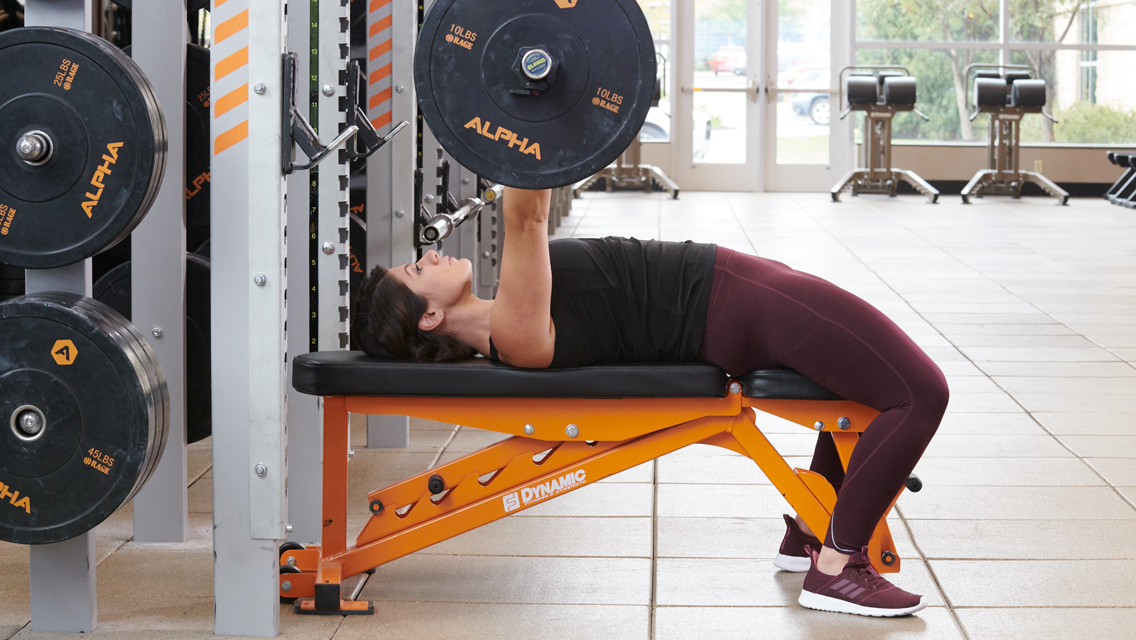
Barbell Bench Press
This classic move builds chest and shoulder strength while also improving stability in the small, intrinsic muscles around the shoulder joint.

Common Barbell Bench Press Form Mistakes
Feet on bench.
Gaudreau sees people place their feet on the bench, often because their feet don’t comfortably reach the floor. But this modification takes the legs out of the lift. “We need to push through the legs to create stability in the core and tension in the lower body when we bench,” she explains. Otherwise, your midsection will rock from side to side as you struggle to stay rooted in place. (There are bench-press variations that remove active engagement of the legs, but if you’re trying to build as much strength as possible, use your legs.)


J-hooks too high or too low.
As with the back squat, avoid setting the J-hooks too high or too low for a bench press. If they’re too high, you’ll have to raise your upper body off the bench to unrack the bar. If the hooks are too low, you’ll do half a bench press to get the bar out of the rack.


Shoulder blades spread apart.
Often, people lie on the bench with their shoulder blades spread apart and back flat. “Internal rotation of the shoulder under load can lead to less stability during the lift and increase the risk of injury,” Gaudreau notes. “Some people can feel their shoulders pinching.”


How to Set Up for the Barbell Bench Press
Engage your legs.
If your feet don’t reach the floor, place weight plates or aerobic steps beside the bench to bring the floor to you. Pull your feet back a bit to create a slight arch from your glutes to your feet. “You don’t want your feet dangling off the bench,” Gaudreau says. Push your feet into the ground (or weight plates or aerobic steps) to create leg tension.
Position J-hooks just shy of an arm’s length above the bench.
Check the barbell height before you begin your first rep. Lying back on the bench, grip the barbell and press up without fully unracking — you’ll know it’s the right height if you only have to press an inch or two to reach full extension.


Pack the shoulders.
After gripping the bar, draw your shoulder blades together and pull them down and back, creating a stable base, Gaudreau advises. “That’s going to put the shoulders in external rotation, which means at the bottom of the bench press, when you get a lot of stretch and your elbows dip very low, you’re not placing a lot of pressure on the front of the shoulder.”
(Should you arch your back during the chest press? See “Expert Answers: Arched Backs and Bench Pressing” for details.)


Pushup
This fitness staple is a full-body exercise that builds core stability as well as back, arm, and chest power.

Common Pushup Form Mistakes
Hands facing inward.
Heilig often sees people rotate their hands toward each other on the floor, which causes the shoulders to roll forward during the exercise. “That’s not going to be a stable position for the shoulder,” she says. In fact, this setup mistake is a common cause of pain at the front of the shoulder.


Chin tucked.
Tucking your chin down to look at the floor is a setup pitfall that can negatively affect your pushup posture. A tucked chin can make your shoulders curl, impeding your range of motion and potentially straining your shoulders, neck, and back.


Lower body not engaged.
Pushups are total-body exercises that are often treated as upper-body exercises. “If you don’t feel your butt engaged, your core probably isn’t engaged either, because they fire together in that position,” Heilig notes. Without help from your glutes, your abdominals can’t hold your spine in a neutral position, causing your ribs to drift forward or your spine to arch.


How to Set Up for the Pushup
Point your index fingers straight ahead.
To get your shoulders in a healthy, stable position, place your hands on the floor with your index fingers pointing straight ahead. Then spread the rest of your fingers to widen your base and think about screwing your hands into the floor. “That’s going to activate your shoulder stabilizer muscles,” Heilig says.


Gaze slightly ahead.
Keep your eyes looking slightly forward and your collarbones broad to put your neck in a more neutral position. That sets your shoulders up for better movement during the exercise.


Squeeze a yoga block or Pilates ball between your thighs.
Heilig often uses this trick with her clients to teach them how to activate their lower body and glutes during pushups. You don’t have to use a prop for all your reps; once you know the feeling of lower-body engagement, imagine squeezing a block or ball to maintain it.
(Here’s how to perfect your pushup. Check out this article if you experience wrist or shoulder pain while performing pushups.)


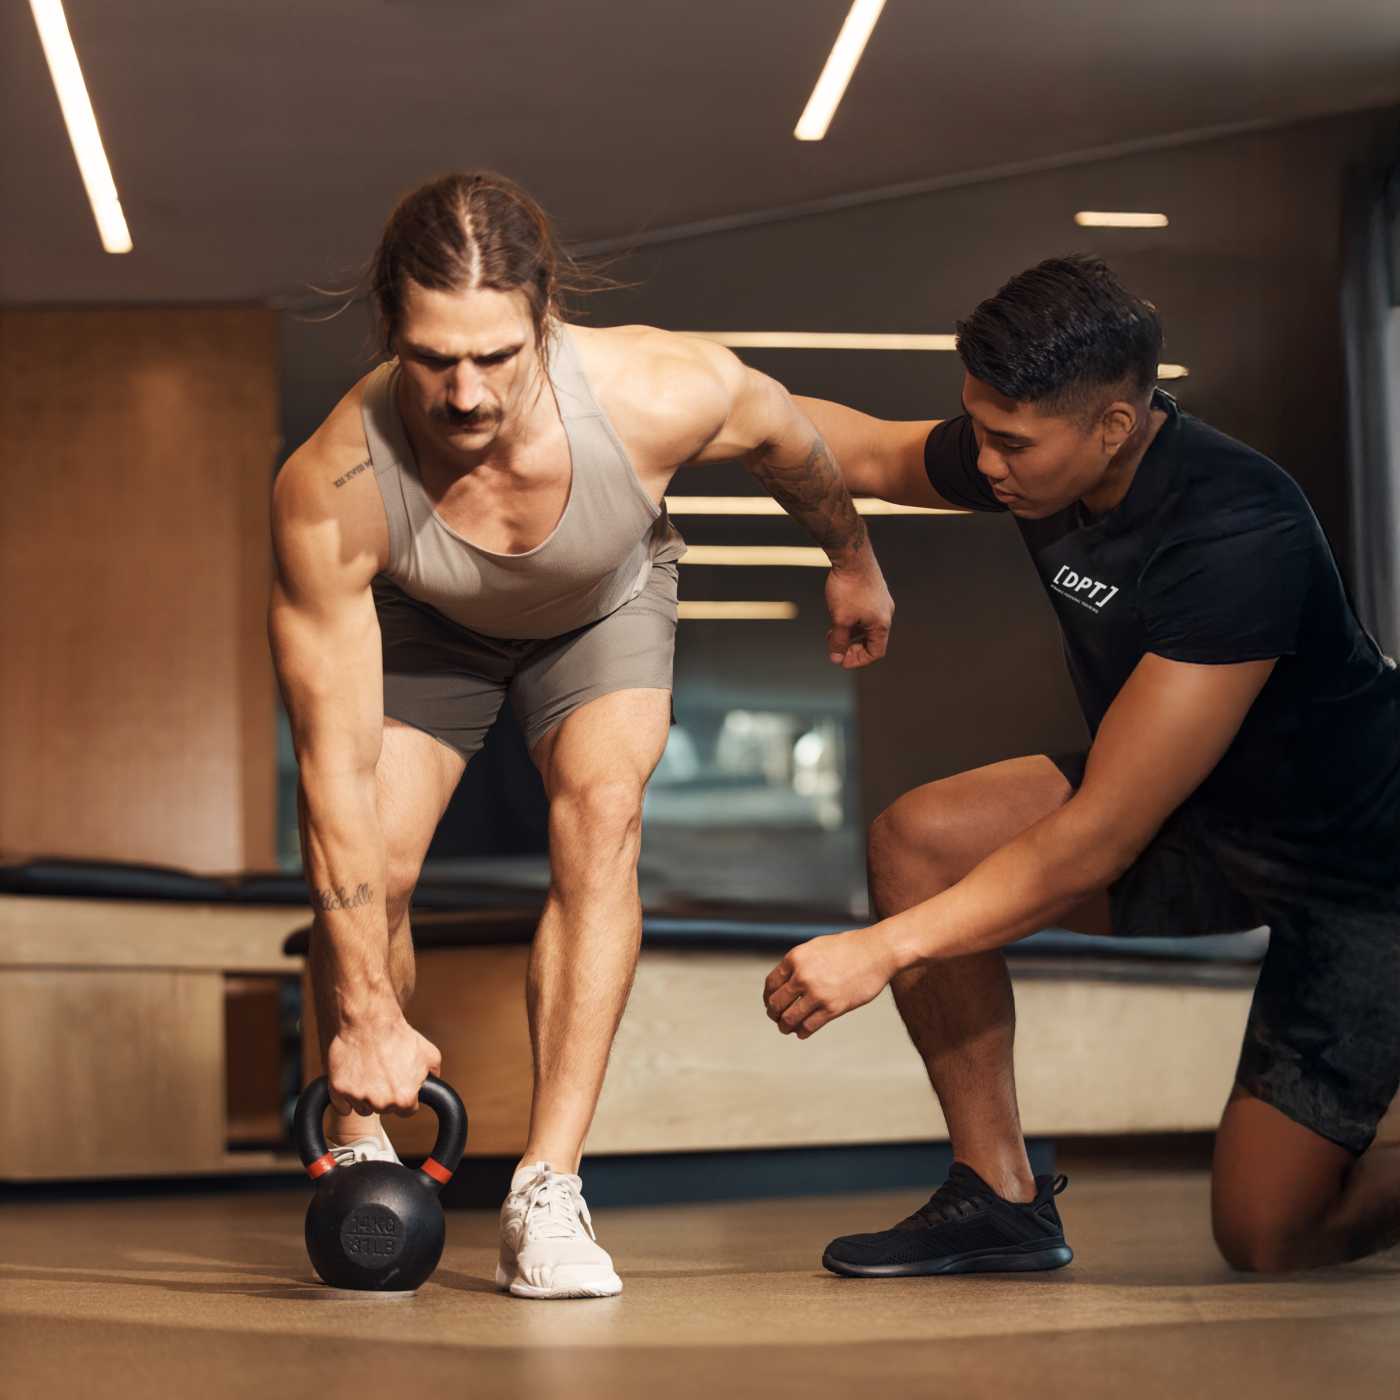
Kettlebell Swing
This dynamic move builds full-body strength and explosive power, working the posterior chain as well as the upper body, namely your lats, forearms, and hands. Swings are also an effective way to build cardio capacity, enhance body awareness, and improve core stability.

Common Kettlebell Swing Form Mistakes
Kettlebell too close or too far away.
Where you set the kettlebell has a major impact on how well you can perform the swing. If the kettlebell is too close, you’ll have to bend your knees, making your swing squatty, Fleming says. But if the kettlebell is too far away, you’ll have to lean forward on your toes to reach it, throwing you off balance once you swing.
Upper back disengaged.
Keeping your upper back relaxed can make it more challenging to transfer power from your hips to propel the weight up. In such cases people often end up using their arms to lift the kettlebell.
Weight unevenly distributed.
It’s common to shift too much weight onto one area of the feet. If there’s too much weight on your toes, your heels may lift off the ground at the top of the swing, causing you to fall forward. Similarly, too much weight on the heels can cause the toes to lift when you hike the kettlebell between your legs, sending you backward.


How to Set Up for the Kettlebell Swing
Set the kettlebell two 1-foot lengths in front of you.
Where you set the kettlebell depends on the length of your limbs. You want the kettlebell far enough in front of your body for you to grip it in a hinged-hip position with your arms straight. A good starting point for most people is to set the kettlebell about two 1-foot lengths in front of their body, Fleming says.


Squeeze that orange.
The same cue you use to engage your upper back during a deadlift works great for the kettlebell swing, Gaudreau notes. Imagining that you’re holding an orange in each armpit helps create upper-back tension and keeps your arms close to your body.
(Master the kettlebell swing with these technique tips to build full-body strength and power.)
Use a tripod foot.
To keep your weight evenly distributed in your feet, focus on keeping three points of contact: the ball of your foot by your big toe, the meat of the foot outside the pinky toe, and the heel, Fleming recommends. “If you can keep those three points in contact with the ground, you should strike a nice balance between stability and power production.”


Bent-Over Dumbbell Row
Building strength through the middle and upper back, lats, and shoulders, this row also enhances mobility through the scapulae and improves stability in the thoracic spine and deep abdominals.

Common Bent-Over Dumbbell Row Form Mistakes
Bent at the waist.
Folding forward at the waist causes your back to round, putting your lower back in an uncomfortable position for the entirety of your set, Fleming says. Instead, you want to hinge at the hips because this keeps your back in a neutral position.
Shoulders rounded.
Gravity naturally wants to pull you down when you’re holding weights toward the floor. As a result, your shoulders and upper back may get pulled forward. This can make it harder to retract your shoulder blade and target the right muscle groups during the exercise.


Feet too far apart.
While you want your feet to be wide enough to provide a stable base for rowing, placing them too far apart prevents your arms from hanging straight down. “You have to accommodate the width of the feet by pulling the arms out slightly to where they have to work outside of the quads,” Fleming explains. This forces you to lift the weights out to the sides and perform a mini lateral raise, “which is asking a lot of your shoulders.”


How to Set Up for the Bent-Over Dumbbell Row
Imagine closing a car door without your hands.
To ensure you’re bending from hips and not the waist, imagine you’re facing away from a car door and need to close it while your hands are holding groceries. “The way you would push your butt back to make that happen is the same concept you want to use to get into a proper bent-over row position,” Fleming says.
Roll the shoulders back.
When you assume the bent-over position with the weights hanging toward the floor, take a moment to roll your shoulders back and down, Fleming suggests. This can help you start the exercise with your shoulders in a good position.


Place feet hip width to shoulder width apart.
Find a foot position that feels stable yet allows your arms to hang straight down without traveling outside the legs.
(Discover intermediate and advanced variations, including the Pendlay row, to elevate your bent-over row at, “How to Do the Bent-Over Row.”)


Split Squat and Lunge
These moves — differentiated by whether both feet remain static (split squat) or one foot steps forward and backward (lunge) — strengthen the glutes, quads, and calves; build hip, knee, and ankle stability; and help improve overall balance.

Common Split Squat and Lunge Form Mistakes
Stance too long.
Many people make the mistake of stepping too far forward or backward, creating a longer stance than necessary. “What happens when the stance is too long is there’s a lot of pressure on the back knee when you lower down because it doesn’t bend as much,” Heilig says. Over time, that added pressure can lead to knee discomfort and pain.
Walking a tightrope.
Another common mistake people make when setting up for a lunge or split squat is stepping one foot directly in front of the other, similar to walking a tightrope. This foot positioning provides an unstable base, causing you to wobble.
Too much weight in the back foot.
Placing too much weight in the back foot takes the focus off the front leg and can irritate your back knee.


How to Set Up for the Split Squat and Lunge
Start in the bottom position.
Setting up in a half-kneeling position can help you find the most comfortable stance length for your body before beginning your set of lunges or split squats, Heilig says. The proper stance length allows you to bend both knees to — or close to — 90 degrees pain-free.
Walk on train tracks.
Instead of stepping one foot directly in front of the other, think of keeping one foot on either side of a train track. Or find your squat stance — for many people it’s feet hip width to shoulder width apart — and maintain that width when you step forward or back.
Think 80/20.
Gentilcore often cues keeping 80 percent of your body weight on the front foot and 20 percent on the back foot. This way, you can target the front leg while placing just enough weight on the back leg to help you balance.
(Fine-tune your lunge form to strengthen your glutes, quads, and knees, and explore five variations to add variety to the move by visiting “How to Do the Lunge.”)


Plank
This isometric full-body hold is a highly effective strength and stability builder, targeting the deep-core muscles of the abdomen as well as the shoulders, glutes, and back.

Common Plank Form Mistakes
Dropping the hips.
“One of the biggest setup mistakes I see is people dropping their hips toward the ground,” Gentilcore says. Not only does this strain the lower back, but it also makes it harder for your abs to fire.
Shoulder blades collapsed.
Letting your shoulder blades draw together is a sign that your upper body isn’t engaged in holding you up off the floor. When your upper body doesn’t pull its weight, your ribs and hips are more likely to drop, making the exercise less effective.


Leaning forward or back.
Your weight should be evenly distributed between your upper and lower body. If you let your body drift forward so your weight is in your forearms, your shoulders will likely round forward and become irritated. If you lean your body back so your weight is in your toes, your lower back will take the brunt of the load.


How to Set Up for the Plank
Engage your lower body.
Gentilcore suggests ramping up full-body tension by flexing your glutes and thighs. Recruiting these lower-body muscles helps engage your abs, keeping your hips from dropping toward the floor.


Push yourself away from the floor.
Press your forearms into the ground as though you’re pushing yourself away from the floor. “That’s going to keep the shoulder blades from touching each other,” Gentilcore says.
Apply pressure through all four contacts.
To prevent your body from leaning too far forward or back, he suggests aiming to distribute your weight equally between four touchpoints: your right forearm, left forearm, right toes, and left toes.
(After you master the plank, pump it up with these variations!)


Photographer: Kelly Loverud; Stylist: Pam Brand; Life Time Models: Lindsey Ogden and Nehemiah Owusu. This article originally appeared as “Strong Starts” in the January/February issue of Experience Life.


Comments (1)
Solid article full of great technique/form pointers.