


With so many variables, strength training can sometimes feel like a repeat of third-grade math: “If Johnny does five sets of 15 pushups, how many total pushups does Johnny do?” Or, “If Susie performs 48 squats and rests one minute for every 12 squats, how many minutes does Susie rest?” But rather than bench your way toward pre-algebra, what if your goal is simply to do the most work in the time you have available?
Enter Escalating Density Training, or EDT, which involves performing alternating sets of two exercises within a given time frame. Sets, repetitions per set and rest time are undefined: All that matters is how many total reps of each exercise you can manage before time is up. No messing around.
“EDT is based on time-management principles,” says its developer, performance coach Charles Staley, MS, author of Muscle Logic and owner of Staley Performance Institute in Phoenix. “A dense workout is one that involves a very low rest-to-work ratio. The denser your workout, the more total work you can accomplish.” More mechanical work in a short period of time means more muscle fibers fire, stimulating gains in strength, definition and muscle size.
Every workout, your goal is to exceed your previous number of reps completed, until you’re ready to increase the weight. This built-in method of progression compels you to work harder, forcing your muscular and cardiovascular systems to adapt. “If you have even a speck of competitiveness, this system brings it out,” Staley says.
EDT is not just for the Olympic athletes and professional weightlifters who report having great success with it. Staley says the method is effective for anyone — and simple enough for beginners. Best of all, you’ll be done with your workout in 30 to 40 minutes.
The Workout
Designed by EDT’s developer, Charles Staley, this routine works your whole body in just 30 minutes (plus warm-up and rest time). The selection of multijoint exercises targets major muscle groups and spikes your heart rate for muscular and cardiovascular benefits.
PR Zone 1
Pairing: Barbell Squats and Cable Lat Pull-Downs
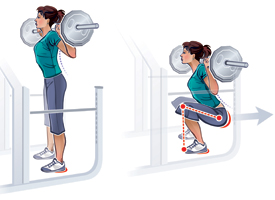
1. Barbell Squats
- With a spotter behind you or using a squat rack, secure a barbell evenly across your shoulders, gripping the bar overhand and just wide of your shoulders.
- With feet hip-width apart, push your hips backward, letting your knees bend. Squat as low as you can while still maintaining the natural arch of your back. Knees should track in line with the second or third toe, and heels should stay on the floor.
- Stand to return to starting position.
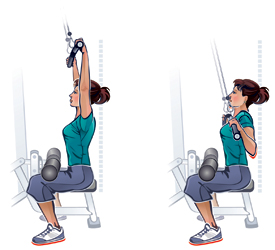
2. Cable Lat Pull-Downs
- Sit at a lat pull-down machine with the pads touching your thighs and feet flat on the floor.
- Stand to grasp the bar with a wide overhand grip and resume seated position.
- Pull bar down in front of shoulders to just below your chin, keeping elbows in line with sides of torso.
- Straighten arms to return bar to starting position and repeat.
PR Zone 2
Pairing: Dumbbell Bench Press and Dumbbell Lunges
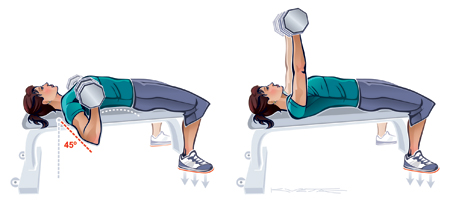
1. Dumbbell Bench Press
- Lie face-up on a bench and press feet into the floor. Maintain the natural arch in your lower back.
- Hold two dumbbells just outside chest, with elbows pointing downward at a 45-degree angle.
- In a circular motion, extend arms so dumbbells come together directly above chest.
- Lower weights to starting position. Repeat.
Note: You may want to ask someone to spot you during this exercise as you get more fatigued.
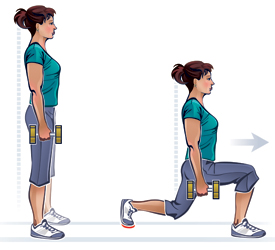
2. Dumbbell Lunges
- Stand with feet hip-width apart, holding two dumbbells at your sides. Keep an upright posture with abs engaged and shoulders pulled back.
- Step forward with your right leg and bend your right knee, letting your left knee drop toward the floor. As you lower your body, don’t let your hips tilt or twist to one side. Your right knee should track in line with your second or third toe. Your left (back) heel should lift up so that only the ball of the foot touches the floor.
- Push off on your right foot to return to starting position. Repeat on left side.
- Each complete left-right movement counts as one repetition.
Get in Your Zone
After you’ve prepared equipment necessary for your first pairing, set a timer for 10 to 20 minutes. On your mark, get set . . .
1. Start your first PR Zone:
- Perform five repetitions of the first exercise, followed by five repetitions of the second exercise. Repeat until it becomes challenging to complete five of each. At that point, drop to sets of four. Continue with this method, reducing the number of repetitions as you begin to feel fatigued. “There are really no rules about how many sets of five to perform before dropping to four,” Staley says. But don’t wait for muscular failure to set in. Staley recommends reducing your reps when you feel you could no longer perform double that amount. If you feel a burst of energy toward the end of your PR Zone, feel free to increase your reps.
- Lift quickly. Not only does this allow you to complete more work within the allotted time, it also recruits more fast-twitch muscle fibers. “It puts more tension on a muscle when you move a load faster. When you accelerate the concentric portion of an exercise (lifting rather than lowering), you are recruiting more fast-twitch motor units,” Staley says.
- Rest between sets. Rest periods may range from 15 to 20 seconds in the beginning to 60 to 90 seconds at the end. “As fatigue accumulates, you can rest as much as you want,” Staley says.
2. Rest. Take a five- to 10-minute breather before starting your second PR Zone.
3. Start your second PR Zone.
4. Progress it. After you complete your workout, add up your tally marks to determine your PRs. The next time you attempt this workout, your goal is to complete more repetitions of each exercise in the same amount of time. Once you can beat this baseline number by 20 percent or more, increase the load by 5 percent or 5 pounds, whichever is lighter.
Pick Your Pairings
The most important element in choosing EDT exercise pairings is to avoid any type of overlap, says its developer, Charles Staley. In other words, you want to make sure you are using different muscles to perform each movement. One option is to choose exercises that recruit antagonist muscles, or muscles that perform opposite actions. As a muscle contracts, its antagonist relaxes, allowing it to recover. A chest press and a wide-grip row is one example of this type of pairing. There are several other ways to pair exercises.
For example:
- Upper and lower body. Shoulder press and squat
- Push and pull. Chest press and lat pull-down
- Distinct, whole-body movements. Dead lifts and chin-ups (these put compressive and decompressive forces on the spine).
- Unilateral movements. Lunges on the right and left sides Be careful that the exercises in your pairings do not rely on the same stabilizing muscles. For example, the antagonist to a squat would be a sit-up, but both are heavily dependent on core strength. “You want to have fresh abdominal muscles to stabilize a squat,” Staley says. Feel free to pair body-weight exercises such as pushups and chin-ups, but make sure that the exercises are equally difficult for you. At any point during the workout, you should be able to complete the same number of reps of each exercise.
Prep Before You Rep
Before you perform an EDT workout, determine your exercise pairings, how much resistance to use and how much time you’ll have for each pairing. You’ll also want to create a chart to keep track of your reps (you won’t have time to think).
1. Select your exercises. A typical EDT workout includes two PR (Personal Record) Zones (see No. 3). During each of these, you will perform two distinct exercises, for a total of four exercises. Staley recommends choosing exercises that have minimal overlap. For instructions, see “Pick Your Pairings”.
2. Find your 10-rep max. Perform a warm-up set of each exercise to estimate your 10-rep max, the weight at which you can perform 10 repetitions but no more. This is the weight you will be using for the workout.
3. Determine your PR Zones. A PR Zone is the amount of time you give yourself to perform each pairing. Staley recommends 15 minutes, although this can range from 10 to 20 minutes, depending on your fitness level. “The time frame you choose isn’t as important as using it consistently so you’re measuring apples to apples when you progress,” he says.
4. Record your reps. Create a chart with four columns (one for each exercise) and five rows (labeled one through five, for number of reps completed). Use tally marks to keep track of how many repetitions of each exercise you perform.
5 Advantages of EDT Training
Novice and seasoned lifters alike can benefit from Escalating Density Training, says Charles Staley, MS, the trainer who developed the system. Here’s why it works.
- Stimulates muscle growth. By the time you’ve completed an EDT workout, you may have performed 50 to 100 repetitions of each exercise. This large quantity of mechanical work in a short period of time stimulates more muscle fibers and results in hypertrophy, or growth in muscle size.
- Improves cardiovascular fitness. The race against the clock keeps you moving and causes your heart to work harder than if you were working at a relaxed pace.
- Ensures progression. Progressive overload, or the gradual increase of load on the body, is crucial to fostering adaptations in muscle strength and size. With EDT, you are constantly progressing, whereas some training programs limit you to the same workload until you can manage a heavier weight. “The idea of bringing up volume or density before increasing intensity is like base building,” Staley says.
- Distracts and motivates. EDT can trick you into working harder than you normally would. “It becomes a game with yourself,” says Staley. “You’re so busy monitoring time and reps that it distracts you from discomfort you’re in.”
- Saves time. Four moves, a little more than 30 minutes, and you’re done. “It’s just an efficient way to pack a lot of work into a short period of time,” says Staley.
EDT Training Chart PDF
Download the Escalating Density Training PDF.
This article originally appeared as “Density Intensity” in the December 2011 issue of Experience Life.


Comments (0)