

Explore the moves:
| Rotational Moves
⋅ Medicine-Ball Throw
|
Antirotation Moves
⋅ Palloff Press |
To rotate or not to rotate? You may have asked yourself this question while training. But building a strong and stable core that can move dynamically isn’t an either-or scenario. Both rotation and antirotation are vital for preventing injury and improving athletic performance, making it important to incorporate both, not just one or the other, into your training.
Rotational movements build strength, power, and explosiveness by following a twisting range of motion, explains Life Time master trainer Joe Meier, CSCS.
“Most common core exercises are performed statically (such as most plank variations) or in the sagittal plane lying on our backs (think crunches, bicycles, leg raises, and sit-ups),” he says. “But many daily movements and lifelong hobbies — from opening a door to playing sports like golf or pickleball — require that we rotate through the transverse plane. Including rotational work in our training not only makes those activities easier to perform, but we’re less likely to hurt ourselves.”
Antirotational exercises train us to stay aligned and stable while resisting an outside force — the twist of rotation.
“Antirotation allows us to train our ability to brace ourselves, which has two major benefits,” Meier says. “First, the ability to resist rotation can help prevent lower-back injuries, something that affects most people at some point in their lives. Second, the ability to stabilize the midsection allows us to efficiently transfer power from our lower body to our upper body, something that happens every time we swing a racquet or golf club or open a door.”
Many people would benefit from incorporating both rotation and antirotation into their training, he adds. (Caveat: Folks coping with a back injury may want to avoid transverse movements. Check with your healthcare practitioner if you aren’t sure.)
For beginners, people recovering from an injury, or exercisers who “feel a tweak” every time they do a twisting motion, Meier advises spending more time on antirotational training from the outset. Specifically, he considers the Pallof press to be a foundational staple for all his clients.
“I typically start everyone with a Pallof press first to see if they can ‘feel’ the correct core musculature stabilizing,” he says.
In this workout, Meier shares his favorite rotational and antirotational moves — including three Pallof-press variations. While you can perform the moves together as a standalone workout, you can also choose a few to incorporate into an existing routine.
Rotational and antirotational core moves pair well with upper- and lower-body strength exercises for a superset. Just be cautious about overdoing a good thing, Meier warns.
“You don’t need five rotational exercises in the same workout,” especially if you’re a beginning exerciser or new to transverse-core training.
Safety Tips
Rotational exercises are important, and how you do them is even more important. Protect your lower back by following these rules:
- Maintain a neutral spine — neither arched nor rounded.
- If your upper back and hips are tight, increase your comfort and range of motion by turning your toes outward up to 45 degrees.
- Keep your core muscles engaged; this helps stabilize your lumbar region.
- Rotate from your thoracic spine (the upper and middle back) and hips.
Because antirotational exercises are inherently designed to resist movement through the core (including the hips, abdominals, and back), the only safety tip for them is to do precisely that: Keep the core stable.
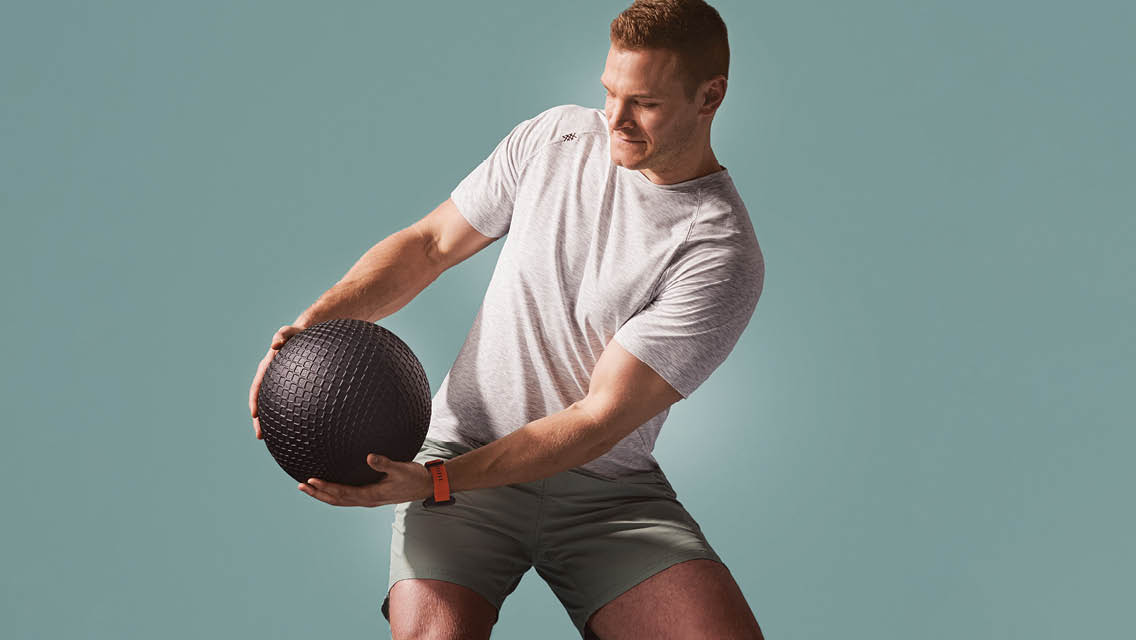
Rotational Moves
Medicine-Ball Throw
- Stand with the left side of your body toward a wall, about 5 feet away, holding a medicine ball. Start in an athletic stance, with feet at least hip width and knees slightly bent.
- Inhale as you rotate your torso away from the wall, moving the ball toward the outside of your right hip. Shift your weight onto your right foot and allow your left foot to pivot.
- Exhale as you rotate to your left, shifting weight to your left foot and slamming the ball against the wall.
- On an inhale, catch the ball as it bounces back to you and immediately rotate toward your right, shifting onto your right foot to repeat the toss.
- Perform six to eight reps per side for two sets.
Cable Chop
- Anchor a resistance band (or a D handle if using a cable machine) at shoulder height and stand with your left shoulder pointed toward the anchor point.
- Grasp the band with both hands at chest level and step far enough from the anchor point to create light tension on the band.
- Extend your arms diagonally over your left shoulder, toward the anchor point.
- In one fluid motion, rotate through your mid-back and perform a downward chopping motion, bringing your hands toward your right hip. Maintain your stance and keep your arms straight as you perform this movement.
- In a controlled manner, return the handle to the starting position.
- Perform eight to 12 reps per side for two sets.
Cable Rotation
- Anchor a resistance band (or a D handle if using a cable machine) at shoulder height and stand with your left shoulder pointed toward the anchor point.
- Grasp the band with both hands at chest level and step far enough from the anchor point to create light tension on the band.
- Extend your arms to your left side, toward the anchor point, so your right arm is straight and stretched across the front of your body.
- In one fluid motion, pull the band or cable to the opposite side of your body until your left arm is straight and stretched across the front of your body. Maintain your stance and keep your arms straight as you perform this movement.
- In a controlled manner, return the handle to the starting position.
- Perform eight to 12 reps per side for two sets.
Antirotation Moves
Palloff Press
- Anchor a resistance band (or a D handle if using a cable machine) at shoulder height and stand with your left shoulder pointed toward the anchor point and feet at least shoulder width apart.
- Grasp the band with both hands at chest level and step far enough from the anchor point to create light tension on the band.
- Brace your core then press the band straight away from your chest until your arms are fully extended. With control, return the band to your chest.
- Repeat for the desired number of repetitions, then repeat with the right shoulder facing the anchor.
- Perform four to 12 reps per side for two sets.
Pallof Press With Overhead Press
- Anchor a resistance band (or a D handle if using a cable machine) at shoulder height and stand with your left shoulder pointed toward the anchor point.
- Grasp the band with both hands at chest level and step far enough from the anchor point to create light tension on the band.
- Brace your core and squeeze your glutes, then press the band straight away from your chest until your arms are fully extended.
- Keeping your arms extended and your core braced, reach forward and up to raise your hands overhead
- With control, reverse the motion to lower your extended arms in front of you, then bend the elbows to return the band to your chest.
- Repeat for the desired number of repetitions, then perform the same exercise with the right shoulder facing the anchor.
- Perform four to eight reps per side for two sets.
Pallof Press With Lateral Step
- Anchor a resistance band (or a D handle if using a cable machine) at shoulder height and stand with your left shoulder pointed toward the anchor point.
- Grasp the band with both hands at chest level and step far enough from the anchor point to create light tension on the band.
- Brace your core and squeeze your glutes, then press the band straight away from your chest until your arms are fully extended.
- Keeping your arms extended and your core braced, take three to four small steps to the right, away from the anchor point, to increase tension on the band.
- With control, reverse the motion to step back to your starting position, then return the band to your chest.
- Repeat for the desired number of repetitions, then perform the same exercise with the right shoulder facing the anchor.
- Perform two to four reps per side for two sets.
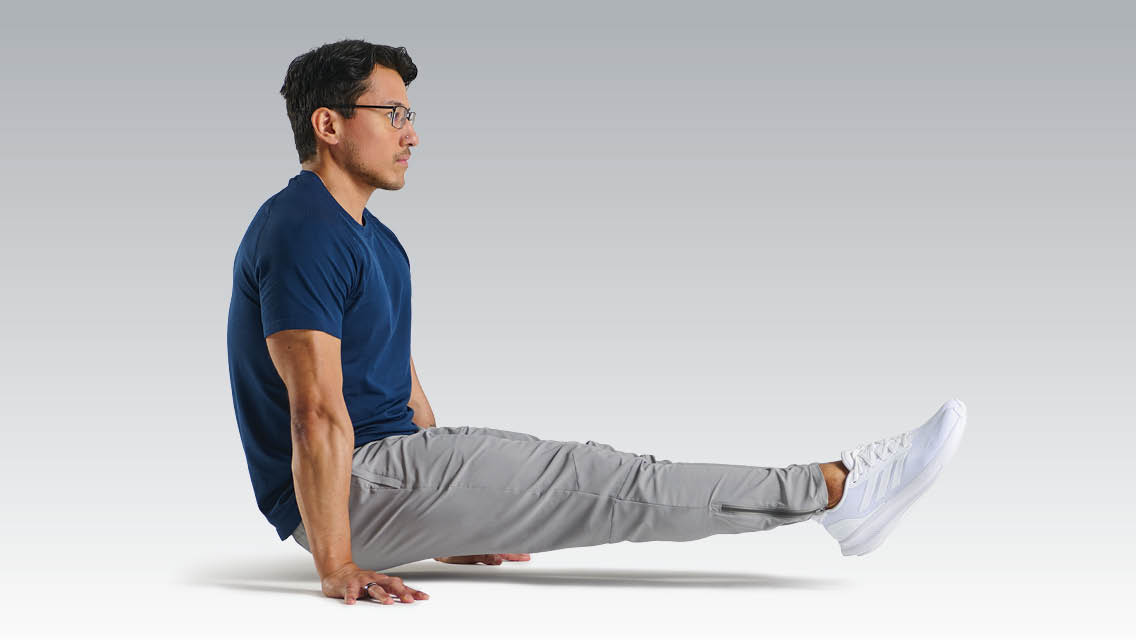
Plank With Alternating Leg Raise
- Assume a high plank position, with your hands slightly wider than shoulder width, your arms extended (but not locked), and your body straight from heels to the top of your head. Distribute your weight evenly across your entire hands and stay neutral: Don’t crane your neck up or drop your head toward the floor.
- While holding this plank position, raise one foot off the ground so your leg is hovering at about hip-height. Don’t let your back arch, your hips pike up, or your body shift or twist.
- Return that foot to the floor, then raise the opposite leg in the same manner.
- Repeat with control, alternating sides on each repetition.
- Perform four to 12 reps per side for two sets.
This article originally appeared as “Core Training With a Twist” in the May 2023 issue of Experience Life.


Comments (2)
Thank you for using a guy in all the exercises for a change!
What band is he using? I would like to purchase it.