

We tend to train strength in straight lines, moving a weight from point A to point B along the most efficient path. The squat, bench press, and deadlift, for instance, are all one-liners with clear paths.
But lifting, like life, doesn’t always present a clear-cut path — there may be stops along the route and transitions that must be negotiated. Simply put, some lifts not only make you strong but also help you learn when to work around, work through, hold steady, and shift to meet each step along the way.
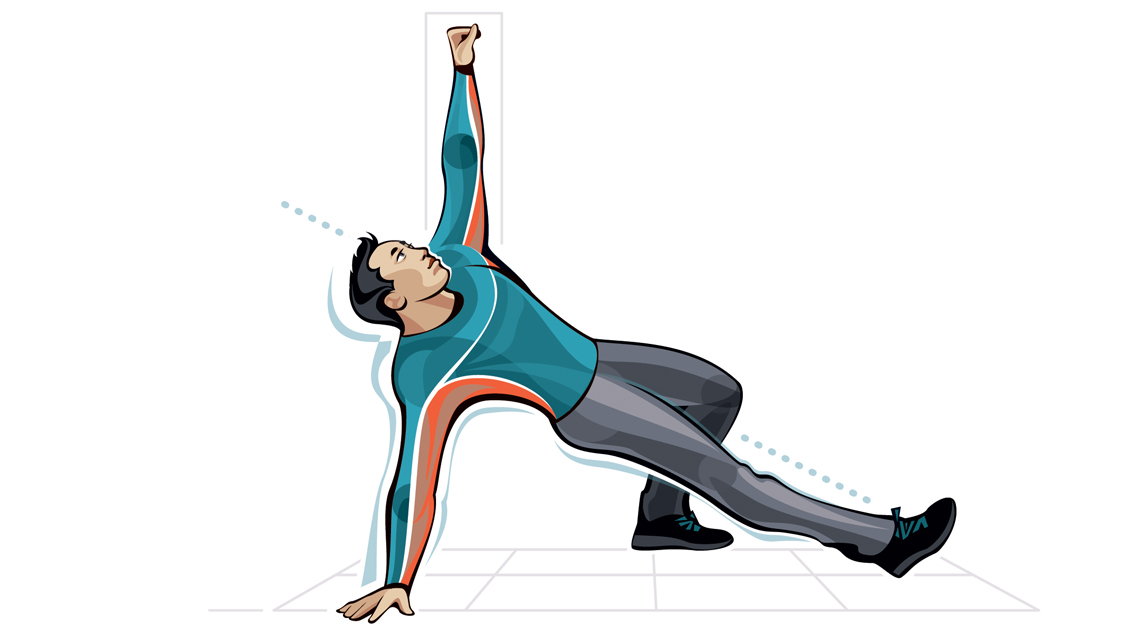
The Turkish get-up (TGU) is precisely the kind of multistep movement that builds strength endurance while teaching your body to adapt to changing stimuli, says Adrianne Ortiz, MS, PES, PN, a Philadelphia-area strength master trainer for Kettlebell Athletics.
The TGU promotes stable joints and a broad base of strength through sweeping ranges of motion. Because your elevation changes — from standing to lying on the floor and back again (or vice versa) — the TGU also challenges your peripheral heart system, which results in better circulation and overall conditioning.
Its functional benefits almost seem too obvious to mention, as getting to the floor and back up again with ease is a keenly useful life skill at every age.
“The Turkish get-up is a dancing movement,” says Ortiz. “It’s long and low and also tall and proud, and people can interpret and emphasize each step differently based on how we are each bodied differently.”
Paired with two other kettlebell mainstays, the windmill and the swing, the TGU trains tension and flow, enhancing your ability to move with both strength and fluidity.
In the following workout, designed by Ortiz, be ready to practice patience and keep your movements slow and smooth. You won’t be pushing speed or weight anywhere near the point of failure.
“I like to look for that magical dose,” says Ortiz. “You could do this workout every day and it wouldn’t fry you.”
The Workout
You’ll be practicing for time, not reps, in this workout, focusing on the skill at hand, says Ortiz. For the first two exercises, set a timer to a two-minute countdown (or for two-minute intervals), resting for that same amount of time between sides. For the third movement, work and rest in 30-second intervals for five to 10 rounds. Perform the workout as instructed one time all the way through.
Never proceed past technical or mechanical failure — that is, do not push to any sort of form or bodily breakdown, or even close.
Reverse Body-Weight Turkish Get-Up:
2 minutes nondominant side (if you’re right-handed, begin with your left hand held aloft)
Rest 2 minutes
Reverse Body-Weight Turkish Get-Up:
2 minutes dominant side
Rest 2 minutes
Half-Kneeling Kettlebell Windmill:
2 minutes nondominant side
Rest 2 minutes
Half-Kneeling Kettlebell Windmill:
2 minutes dominant side
Rest 2 minutes
Hand-Release Kettlebell Swing:
Set a timer for intervals of 30 seconds of work and 30 seconds rest, and perform five to 10 rounds (either single-sided or alternating), working and resting in equal measure.
The Moves
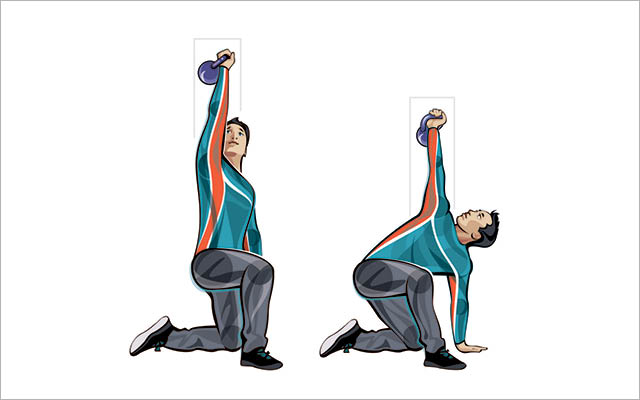
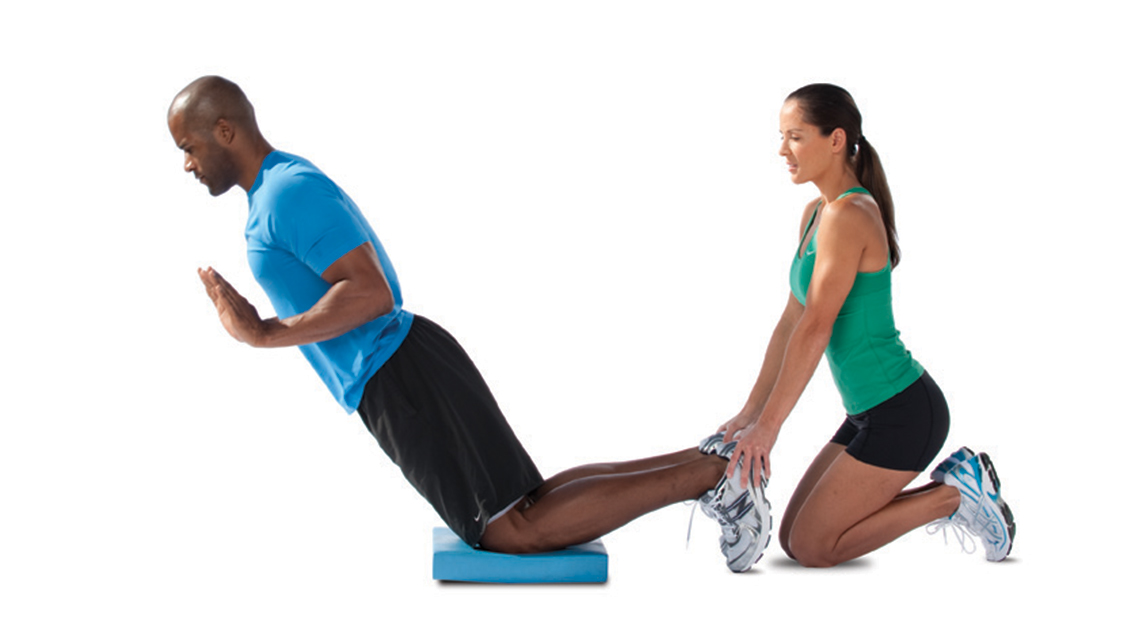
1. Reverse Body-Weight Turkish Get-Up
Builds strength endurance, spatial awareness, and stable joint beds, while improving alignment and controlled range of motion.
Ortiz teaches the TGU from the top down rather than from the more typical position on the floor because “it clicks much faster,” she says.
“Starting from standing is more practical because it taps into firmer, more established motor pathways: More people will find it easier to begin with a reverse lunge than a glute-roll onto their side from flat on their backs. It’s a firmer, safer structure.”
She also prefers drilling the movement with body weight alone at first and for a good long time, until form is solidified, due to common shoulder restrictions.
“Most people hide movement dysfunction or inefficiencies with speed,” she explains. “Really work to keep the extended arm locked out at the elbow throughout the exercise.”
And remember, if you don’t feel prepared for the full exercise, honor each component as its own movement, and perform any of them separately. You can always string them all together later.
If you like, balance a soft object like a shoe atop your raised fist to provide neuromuscular feedback about what’s wiggling and what’s steady, and what transitions are particularly noteworthy.
1. Stand with your feet under your hips and raise your left arm directly over your head, elbow locked throughout the movement.
2. Step your right foot backward until that same-side knee is touching the ground, with an even weight distribution between your front heel and back knee.
- Option 1: Windshield-wiper the lower part of your right leg behind you so that the front of your right hip opens to the right and your legs form an approximately 90-degree angle from one another.
- Option 2 (whichever is comfier): Bring your front left leg even farther to your left so your legs reach that open 90-degree angle.
3. Look up at the bell until you return to the lunge position.
4. Bring your right hand to your hip and trace it down the front of your thigh to the floor, simultaneously pushing your hips backward, and then placing your right hand about one hand’s length in front of your right knee. Your planted right hand, right knee, and right foot should form a relatively straight line.
5. Shift your weight into your left foot and right hand and press downward so that you can sweep your right leg forward until it is straight out in front of you, angled out slightly.
6. Slowly (without dumping your weight into your right shoulder) lower your upper body backward using the assistance of your right arm and the muscles of your torso until you are completely on your back, left fist still pointing at the sky.
7. From here, reverse the movement, driving through your left heel and right shoulder blade and rolling onto your right side by rowing your right elbow backward, left fist still raised.
8. Slowly raise your right arm and position your hand so that you can again place your weight in your right hand and left foot, creating a bridge through which you can press into the ground and withdraw your right leg from in front of you, again forming that straight lineup of right hand, knee, and ankle.
9. Shift your hips backward until you are able to lift your right hand (you’re still looking at the bell), then again either windshield-wiper the bottom of your right leg to the left (Option 1), or bring your left leg around the front to the right (Option 2), either way returning to the lunge position. You may look from the bell to affix your gaze to the horizon.
10. Drive through your front heel and the ball of your back foot, taking a step forward and ending in the same standing position in which you began. Repeat for desired number of reps and then switch sides.
2. Half-Kneeling Kettlebell Windmill
Patterns and strengthens segmented movements within the TGU; builds rotational strength; and improves core strength, shoulder stability, and spatial awareness.
This movement addresses what is often the stickiest transition in the fullest version of the TGU: the weight transfer from hip shift to hand lift. “It can be difficult at first to understand physically where your weight is and where it’s going,” says Ortiz. “This movement helps you understand where your body is in space and helps to pattern the hip-hinge movement,” a critical piece of transitioning from on the ground to back up again safely, and for keeping your alignment neatly vertical even as you’re moving horizontally.
1. Set up in the same kneeling position from the TGU where the lower part of the back leg is swept to the side, forming an approximate 90-degree angle with your front and back legs. A (light) kettlebell should be right in front of you.
2. If your right leg is forward, reach down and grasp the handle of the kettlebell with your left hand first, right hand grasped around that hand for help in maneuvering the weight to a racked position at shoulder height, thumb pressed against your body and the weight of the kettlebell resting on the back of your wrist. Press the kettlebell overhead. Look up at the kettlebell. This is your full start position.
3. From here, continuing to look up at the kettlebell, push your butt backward toward your back heel, simultaneously reaching your right hand toward the ground.
4. When you can place your hand on the floor, reverse the motion and drive your hips forward, returning to an upright position. Repeat for desired reps, returning to the racked position each time, and repeat on the other side.
5. Once this movement becomes comfortable, you may remove the helper hand and bend that arm, hinging your hips backward and reversing the movement when your elbow nears or touches the ground.
6. If you start to lose your back position or shoulder stability, or your elbow begins to bend, immediately stop and return to the starting position. (Ideally, you will stop before this even starts to happen.)
3. Hand-Release Kettlebell Swing
Develops power and metabolic conditioning; hones coordination and focus; and engages your whole system.
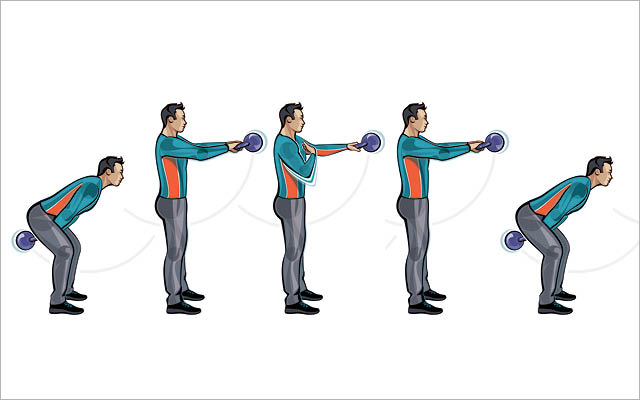
All variations of the kettlebell swing promote powerful hips and glutes, but the hand-release swing is notable for training coordination and engagement. Additionally, the powerful rowing motion — a “pluck” of your hand from the handle at the apex of each swing and then quickly back on again, says Ortiz — activates the lats, the large muscles running down the outsides of your back and sides. And, because you’re releasing the handle briefly, you learn to efficiently manage the kettlebell in space.
1. Stand about a foot’s length behind a kettlebell on the floor in front of you, feet about shoulder width apart. Point feet outward slightly, if that feels more comfortable.
2. Bend your knees slightly, shoulders remaining above hip height, and push your hips backward. As you do so, grip the handle with two hands, pretending to break the handle in half to activate your lats.
3. Hike the kettlebell back high up between your legs, slightly straightening your legs as you do so.
4. Quickly stand up, using the power of your hips, hamstrings, and glutes to “float” the kettlebell up to approximately shoulder height, taking care to keep your shoulders pulled back and down. (Don’t let the kettlebell pull your chest forward.) Your body should form a straight line from head to heel as the bell reaches the top of the swing.
5. As it does, remove one hand and quickly bring it back to your chest, then just as rapidly return your hand to the handle of the kettlebell in time for the downswing.
6. As the kettlebell arcs downward, stay upright as long as possible before you push your hips backward and swing the kettlebell again high and back between your legs.
7. Once you reach the bottom part of the swing, reverse the movement by using the power of your posterior chain to pop the kettlebell forward and up again.
Either remove the same hand as before, repeating that side for the desired number of reps, or alternate hands each rep.
When you’re ready to stop, gently park the kettlebell on the floor in front of you after a backswing.
This article originally appeared as “Groove Your Get-Up” in the March 2021 issue of Experience Life.


Comments (0)