Gearing up for a new season that resembles something closer to our pre-pandemic lives is giving many of us some reason for pause: How do we jump back into a routine if we’ve been out of one for a while? How do we start a program if this past year has given us a renewed desire to focus on our health?
Fitness is an element worth strategizing. “In 28 years of working with clients, I can tell you that spending time to create a vivid picture of your future self is the most important place to start with any health and fitness program,” says Jason Stella, CPT, PES, CES, national education manager for Life Time and host of the Life Time Training Talks podcast. “From there, an actionable plan that you find challenging and enjoyable is the most critical element to sticking with your exercise efforts.”
To make sure you’re set up to succeed, Stella designed this monthlong cardio- and strength-focused workout plan you can follow — regardless of your starting fitness level.
The Plan
This 30-day program includes four workout days each week. You’ll complete the same workout on days one and three, and days two and four. (For best results, workout two days on and one day off, then two days on and one day off again.)
Each workout spans 40 to 45 minutes in total and includes a 10-minute warm-up, 20 minutes of strength training, and 10 to 15 minutes of metabolic conditioning.
The strength-training portions are designed to be total-body circuits, geared toward seven functional movement patterns that most of us do in our daily lives: squat, hinge, lunge, push, pull, rotation, and gait/walking/running. Improving your ability to complete these movements during an exercise program can transfer to more ease and comfort in everything you do.
The metabolic-conditioning portion is a form of sprint interval training (SIT), an all-out sprint intensity done for a short period time at nearly 100-percent effort. If SIT is done correctly, it can drive improved body composition in shorter exercise durations.
(Note: SIT is different than HIIT, or high-intensity interval training. Most of the classes and workouts that are categorized as HIIT are high-intensity steady states (HISS). HIIT, when originally developed, called for an all-out maximal effort for 20 to 30 seconds, followed by 60 to 120 seconds of rest. This allowed enough rest for the body to recover and complete another maximal effort of the exercise. When the rest is eliminated, however, you are no longer doing interval training, but rather a steady-state of training at a high intensity.)
After consistently following this workout plan for 30 days, you can expect to see improvements in your functional performance of daily activities, as well as muscle endurance, body composition, and overall well-being.
The Warm-Up
Before each workout, spend five minutes doing your choice of cardiovascular exercise, such as running, biking, or rowing, at low to moderate intensity, getting your heart rate to 65 to 75 percent of your anaerobic threshold (if you are using Life Time’s heart-rate zones, this would be at high zone three and low zone four). If you’re not using a heart-rate monitor, then it would be a seven to eight on the rate of perceived exertion (RPE) scale. This level of exertion should cause you to breathe heavily.
Following your cardio efforts, complete “The World’s Greatest Stretch”:
- Start in a plank position with your hands under your shoulders and your feet together. Keep your body in a straight line from your head to your heels. Engage your core and do your best not to let your butt go up in the air or sag down.
- Step your right foot outside your right hand to bring yourself into a low runner’s lunge position. Keep your right foot flat on the ground; if you are less flexible, focus on not letting your heel lift.
- Using your left hand for support, lift your right hand off the floor and draw your right elbow toward the instep of your right foot. Gently shift your body front to back and side to side until you feel a nice stretch in your hip and glute.
- Slowly begin to draw your right arm up and rotate your torso to stretch your arm toward the ceiling, opening your chest to face your right leg. You’ll feel a stretch in your hips, glutes, back, and chest.
- Bring your right hand down to the ground and drop your left knee to the ground. Sit back on your left heel and let your right leg straighten out in front of you to stretch your right hamstring.
- Shift forward, back into the low runner’s lunge: Bend your right leg and lift your left knee off the ground.
- Step your right foot back to return to the starting plank position and switch sides.
- Complete five to 10 reps per side.
Metabolic Conditioning: Sprint Interval Training
After each strength-training session, complete this MetCon. Select your choice of preferred equipment: an Airdyne or stationary bike, treadmill, or total-body elliptical. Complete the following:
- Warm up for five minutes, aiming to get your heart rate to 60 percent of your heart rate max.
- Complete four sets of the following:
- 30 seconds of all-out effort: Increase speed/intensity to go as fast and hard as you can (minimum level 8 on a max exertion scale of 10).
- 30 seconds active recovery: Reduce speed/intensity to a slow pace, but do not stop moving.
- Cool down for three to five minutes, bringing your heart rate to 35 to 40 percent of your max.
The Workout: Days One and Three
Strength Training
These exercises are grouped into two circuits:
- Circuit A: Complete all four exercises back to back, then rest for 45 seconds. Complete a second set, and rest for another 45 seconds before moving on to Circuit B.
- Circuit B: Complete all three exercises back to back, then rest for 45 seconds before completing a second set. Rest for another 45 seconds before moving on to the metabolic-conditioning portion of the workout.
If you’re new to strength training, the tempo may be an unfamiliar variable to you, but using it can impact your results. The four digits represent the time, in seconds, recommended for completing each repetition. The first number represents the eccentric movement (lowering the weight), the second number is the pause between movements, the third signifies the concentric movement (lifting the weight), and the fourth is the pause before the next rep starts.
For example, for a 2020 tempo, you’ll do the eccentric movement for 2 seconds, not pause before moving into the concentric movement for 2 seconds, and move immediately into the next repetition without pause.
| Circuit | Order | Movement Type | Exercise | Sets | Reps/Time | Tempo | Rest |
| A | A1 | Lunge | Forward lunge | 2 | 15 | 2020 | 0 |
| A2 | Push | Pushup (modify as needed) | 2 | 15 | 2020 | 0 | |
| A3 | Push | Dumbbell standing shoulder press | 2 | 15 | 2020 | 0 | |
| A4 | Core/walk | One-arm kettlebell carry at shoulder | 2 | 30 seconds/arm | Slow and controlled | 45 seconds | |
| B | B1 | Lunge | Split squat to one-arm shoulder press | 2 | 15 | 2020 | 0 |
| B2 | Push | Incline press (with dumbbells) | 2 | 15 | 2020 | 0 | |
| B3 | Core/walk | Farmer’s carry | 2 | 30 seconds/arm | Slow and controlled | 45 seconds |
Circuit A Exercises
Forward Lunge
- Stand tall with your feet hip width apart.
- Step forward with one foot, keeping your chest proud and shoulders squared over hips.
- Allow both knees to bend, with your back knee hovering just above the floor. (Adjust the length of your stride as needed).
- Keep your front knee in line with your middle toe. Take care not to relax the back leg at the bottom of the move.
- Reverse the movement by pressing through your heel and stepping your front foot back to the starting position.
Pushup
Modify to a knee pushup if needed, working your way to as many regular pushups as you can do in each set.
- Assume a high-plank position, with hands slightly wider than shoulder width, arms extended (but not locked), and body straight from heels to the top of your head.
- Keeping your body straight and your head in a neutral position, engage your core, and squeeze your glutes. Bend your arms and retract your shoulder blades to lower yourself until your arms form 90-degree angles.
- Reverse the movement, pushing yourself back to the starting position without breaking the straight line from head to heels.
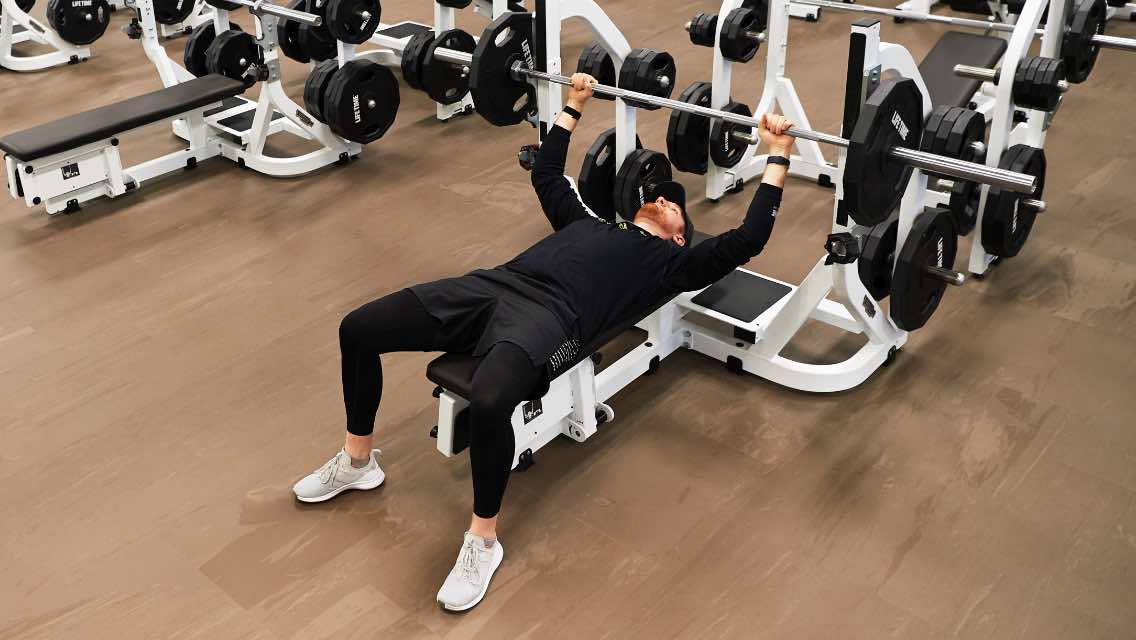
Dumbbell Standing Shoulder Press
- Stand with your feet shoulder width apart, a dumbbell in each hand. Begin with the dumbbells just below ear level, palms forward.
- Press both dumbbells straight overhead as explosively as you can while keeping your feet grounded. Activate your abdominal muscles to maintain neutral posture and lower-spine stability.
- Return to the start position on a two-count.
One-Arm Kettlebell Carry at Shoulder
- Stand tall and squat down to grab a kettlebell with one hand. Lift the kettlebell to your shoulder and place it in the front rack position (the bell will be resting against your wrist).
- Stabilize the kettlebell and walk forward slowly for 45 seconds; consciously engage your core throughout the movement.
- Place the kettlebell back on the ground and repeat on the other side.
Circuit B Exercises
Split Squat to One-Arm Shoulder Press
- Stand tall and lift a dumbbell or kettlebell with one hand. Bring the weight to shoulder height and shift your wrist so your palm is facing out.
- Step back with one leg to bring yourself into a lunge position. Allow both knees to bend. Position your back knee to hover above the floor and your front knee so it’s aligned with your middle toe.
- Press the weight toward the ceiling and straighten your legs in one fluid motion.
- Complete steps one through three a total of 15 times, then switch sides.
Incline Press
- Using a bench that inclines, adjust the back so it’s inclined at approximately 15 degrees. (You can also elevate one end of a freestanding bench if an incline bench is not available.)
- Sitting on the lower end of the bench, hold two dumbbells in front of you, resting them against your thighs.
- Lie back, bringing the dumbbells to the bottom position of the bench press, so your upper arms are at the sides of your chest. Press your feet into the floor and arrange your hands in the most comfortable position for you: Palms can be facing inward in a neutral grip or forward, toward your feet.
- Press the weight straight up over your chest until your arms are fully extended above your sternum.
- Lower the dumbbells completely and with control, then immediately press them back up.
Farmer’s Carry
- Pick up something heavy in one or both hands – a kettlebell, heavy bucket, a can of paint or a duffel bag are all great options.
- Hold the weight by your side(s), making sure that you’re not leaning to either side, hunching forward, or leaning back.
- Stand tall, shoulders away from your ears, and start walking.
- Set the weight down gently once you feel your grip loosen or your form deteriorate.
The Workout: Days Two and Four
Strength Training
These exercises are grouped into two circuits:
- Circuit A: Complete the four exercises back to back, then rest for 45 seconds. Complete a second set, and rest for another 45 seconds before moving on to Circuit B.
- Circuit B: Complete each exercise, then rest for 45 seconds before completing a second set. Rest for another 45 seconds before moving on to the metabolic-conditioning portion of the workout.
| Circuit | Order | Movement Type | Exercise | Sets | Reps/Time | Tempo | Rest |
| A | A1 | Hinge | Kettlebell swing | 2 | 15 | 2020 | 0 |
| A2 | Pull | Assisted pull-up (machine or band) | 2 | 15 | 2020 | 0 | |
| A3 | Hinge/core | Glute bridge | 2 | 15 | 2020 | 0 | |
| A4 | Core | Lower- body Russian twist | 2 | 40 (20 per side) | Slow and controlled | 45 seconds | |
| B3 | B1 | Squat | Goblet Squat | 2 | 15 | 2020 | 0 |
| B2 | Pull | Dumbbell bent-over row | 2 | 15 | 2020 | 0 | |
| 2b | Core | Sit-up | 2 | 15 | Slow and controlled | 45 seconds |
Circuit A Exercises
Kettlebell Swing
- Stand with your feet about shoulder width apart and a kettlebell 1 to 2 feet in front of you. Hinge at the hips to reach down and grasp the kettlebell.
- Tip the kettlebell handle toward you. With your core engaged and lower back flat, quickly “hike” the kettlebell backward, high between your legs.
- Reverse the movement by forcefully driving your hips forward. Contract your glutes to come to standing as the kettlebell swings out in front of you.
- Engage your lats once the kettlebell reaches its apex to push it back between your legs. Repeat for recommended reps, then “park” the weight in front of you with control.
Assisted Pull-Up (Machine or Band)
For Machine
- On a pull-up machine, place your feet or knees on the counterweight lever. With hands just outside of shoulder width, grasp the bar or handles with an overhand grip.
- With your core engaged, exhale and pull on the bar until your chin is completely over the top of it; keep your gaze forward.
- Slowly lower on a count of two until your arms are fully extended at the bottom of the repetition.
For Band
- Place a box or bench beneath a chin-up station.
- Hang a heavy exercise resistance band over the bar, then pull the shorter loop through the longer one.
- Stand on the bench and place one foot through the loop.
- Grasp the bar with either an overhand or underhand grip and step off the bench, allowing your arms to straighten fully.
- Keeping your body still, slowly pull yourself upward until your chin clears the bar.
- Reverse the movement and repeat for reps.
Glute Bridge
- Lie on your back with your knees bent and feet flat on the floor. From this position, engage your core, press your back into the floor, and begin squeezing your glutes.
- Keep the glutes engaged and weight distributed evenly across both feet as you press your hips up. Extend your hips fully so your body forms a straight line from your knees to your shoulders. Keeping your hips in proper alignment will prevent overextending and arching your back.
- Immediately reverse the movement — keep squeezing your glutes and don’t collapse to the floor — to return to the starting position.
Note: For an additional challenge, you can add weight by holding a weight plate, dumbbell, or kettlebell on your lower abdomen; adjust placement to allow the crease of your hips to move freely.
Lower-Body Russian Twist
- Lie flat on the floor and extend your arms out to the sides so your body forms a “T” shape.
- Form a 90-degree angle with your legs by bringing them up and bending your knees so they’re directly above your hips.
- Keep your knees together and bent, and your shoulders and arms connected to the ground. Rotate your legs to the left until the side of your left leg hovers near to the floor.
- Return to the starting position and repeat on the right.
Circuit B Exercises
Goblet Squat
- Holding a kettlebell or dumbbell at your chest, stand with feet hip width apart.
- Push your butt back and bend your knees to lower yourself into a squat. Keep your torso upright and knees in line with your toes throughout the movement.
- Drive through your heels to push up as you rise to stand.
Dumbbell Bent-Over Row
- With a dumbbell in each hand and arms hanging by your sides, hinge at the hips so your chest is about 45 degrees from the floor.
- Draw your shoulder blades together and bend your elbows toward your hips to pull the dumbbells toward your rib cage.
- Lower the weights with control until your arms are straight.
Sit-Up
- Lie on your back with your knees bent and your feet flat on the floor. Cross your arms across your chest, placing your hands on your opposite shoulders.
- Rest your tongue on the roof of your mouth — this helps support your neck strength through the movement while preventing straining.
- Draw your chin to your chest, engage your core, and raise your upper body off the floor to a seated position. Slowly reverse the movement and return to starting position.