

Want to sprint faster? Jump higher? Avoid knee and back pain? With a strong set of glutes and hamstrings behind you, you can achieve all of this and more.
Simply running or squatting once a week isn’t enough to build or maintain a powerful lower body, but celebrating your rear end through exercise doesn’t have to be a 24/7 endeavor either, explains Anna Taylor, NASM, USAW, Alpha, a Life Time personal trainer and small-group training coach. Twice-weekly glute-and-hamstring strength sessions — performed consistently with progressively heavier weights — can do the trick.
About two hours of targeted time each week can help increase strength and power, improve posture, and prevent injury and pain (particularly in the lower back and knees), says Taylor, who designed and is pictured demonstrating the following eight-week program.
“Glutes and hamstrings are your ‘Go!’ muscles,” she says. “They generate power and help you move with speed and control.”
Glute-and-hamstring training has played a major role in Taylor’s personal fitness journey, which has included postnatal recovery, improvements in knee and back pain, and better overall athletic performance.
“I love crushing some heavy-weighted leg exercises: There is something about lifting heavy weights in a glute session that feels amazing,” she notes. “These are the biggest and strongest muscles in the body — why not train them correctly?”
The Program
The following eight-week program consists of two lower-body-focused strength workouts per week. For beginner or returning exercisers, these might make up their total strength-training routine initially. On your nonlifting days, choose an active-recovery activity that you enjoy: Walking, dance, and yoga are great choices.
More experienced lifters can incorporate these two workouts into their existing training routines. To complete a full-body split program, Taylor suggests, offset these lower-body strength days with two weekly upper-body strength days.
If you also enjoy another lower-body-focused activity, such as running or cycling, schedule these workouts on off days and make sure to include at least one active-recovery day per week.
The exercises will stay the same for all eight weeks, giving you an opportunity to refine your form and improve your body mechanics. What will change each week is the number of sets and reps and, with these, how much weight you use.
As a general rule, the more reps you perform, the lighter your weight will be. And vice versa: On lower-rep weeks, you’ll want to increase the weight.
The full schedule appears at the end of the article.
Instructions
Begin each workout with a dynamic warm-up. (Find our favorite warm-up routine at “The Perfect Warm-Up“.)
Perform A, B, and D exercises as straight sets, completing all sets and reps for each exercise before moving on to the next. Perform C1 and C2 exercises as supersets, alternating between the two moves for each set.
Rest as needed between sets; one to two minutes will likely be sufficient, but this is a good opportunity to listen to your body.
Day 1 Exercises
A: Heels-Elevated Pause Squat
Full Instructions
- To set up for elevating your heels, place two 25-pound bumper plates or a wedge board on the floor where you will be squatting. Then, position a barbell in a squat rack just below shoulder height.
- Step underneath the bar and position the weight on your upper traps, just below the bony part of the back of your neck.
- Positioned directly under the bar, stand up with the weight, and then, taking small steps, back up to the weight plates (or wedge board) and elevate your heels, keeping your stance about hip width to shoulder width apart.
- Keeping an upright posture, bend your knees and lower your body with control. Don’t let your knees cave inward, but do allow them to travel in front of your toes as you lower your hips to below knee height. This is meant to be a deep squat; your hamstrings may touch your calves.
- At the bottom of the movement, pause for a moment. You will want to come to a complete stop, eliminating any possible bounce out of the bottom of your squat.
- With control, reverse the motion to stand up fully.
Modification: You can also perform a heels-elevated goblet squat by holding a kettlebell at chest height instead of supporting a barbell on your back.
B: Single-Leg (SL) Bulgarian Deadlift
Full Instructions
- Stand with your back 2 to 3 feet from a bench or box no taller than knee height.
- Extend your right leg behind you and place your foot on the step.
- Bend your front knee slightly, square your hips and shoulders, and balance your weight between your feet.
- Keeping your back neutral throughout the movement, hinge forward at the hips and extend your hands toward the floor, stopping the movement when you start to lose the natural arch in your lower back.
- Return to the starting position by pushing through the heel of your front foot.
- Complete all reps on one side, then repeat with the opposite leg elevated.
Modification: To add weight, hold a dumbbell in each hand.
(Explore simple variations of the Bulgarian split squat to shift the focus to your glutes or quads for targeted results.)
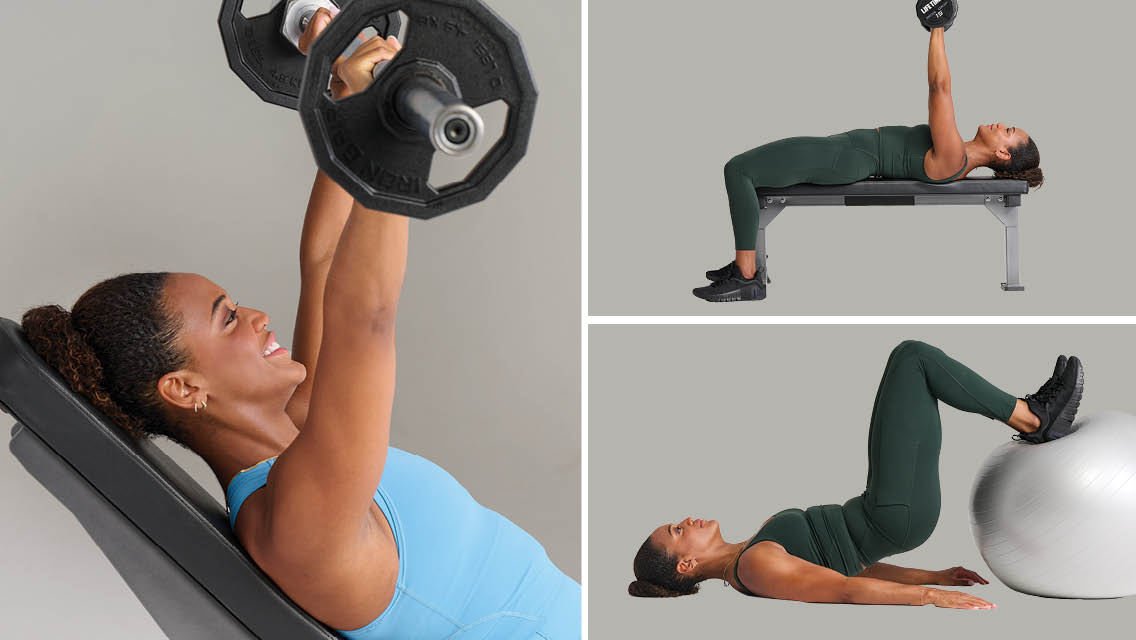
C1: Barbell Hip Thrust
Full Instructions
- Sit on the floor and position your upper back against a flat bench.
- Roll a loaded barbell up your legs to the crease of your hips and bend your knees so your feet are flat on the floor. (If needed for comfort, place a rolled-up yoga mat between your hips and the bar.)
- Hold the bar in place and press your hips into the air until they are fully extended. Your back should rest on the bench.
- Lower your hips and the barbell back down, keeping your upper back pressed against the bench throughout the movement.
Modification: As an alternative to using a barbell, you can use a glute-bridge machine, known as the Glute Drive.
C2: Seated Banded Hip Abduction
Full Instructions
- Loop a small, closed-loop resistance band around your thighs, just above your knees. Sit tall on a bench, box, or chair.
- Position your feet to about hip width apart, so there is some tension on the band, with your knees directly over your ankles and both feet planted firmly on the floor.
- Sit tall, lengthening through your spine, and avoid slouching throughout the movement. Brace your abs and press your legs into the resistance band. Use your hips to open your knees to either side. Slowly reverse the movement, bringing your knees back together with control.
Modification: Instead of sitting on an elevated surface, try sitting on the floor with your elbows resting behind you on a bench.
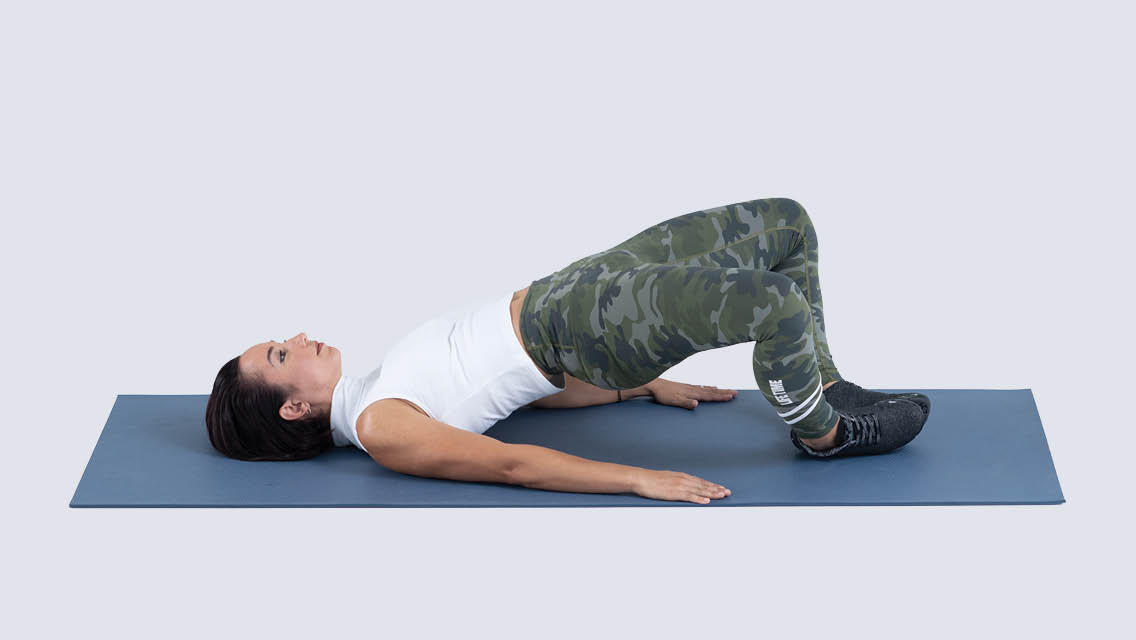
D: Frog Bridge
Full Instructions
- Lie on your back with the soles of your feet together and your knees bent and open to the sides. From this position, engage your core, press your back into the floor, and begin squeezing your glutes.
- Keep your glutes engaged as you press your hips up and extend them fully. Take care not to overextend and arch your back.
- Slowly reverse the movement — keep squeezing your glutes and don’t collapse to the floor — to return to the starting position.
Modification: If the “frog” position causes discomfort, perform a standard glute bridge with both feet flat on the floor. (For details, visit “BREAK IT DOWN: The Glute Bridge“.)
Interested in doing this workout?
Access it now on the Life Time app.
Simply open the app, go to Explore, and find Workouts & Programs to enroll.
Day 2 Exercises
A: Romanian Deadlift
Full Instructions
- Begin by holding a weight at the top of your deadlift, either by deadlifting the weight from the floor or unracking it at hip height. Brace your core and engage your lats.
- Initiate the movement by hinging your hips back. Keep the weight close to your body as it travels down your legs. Maintain a straight, flat back and a soft bend in your knees throughout the move.
- Once your hips can no longer reach back, squeeze your glutes and thrust your hips forward to return to standing. Avoid shrugging your shoulders, especially when returning to standing. Squeeze your glutes at the top of the exercise in each rep.
Modification: Instead of holding a barbell, hold a set of dumbbells or kettlebells.
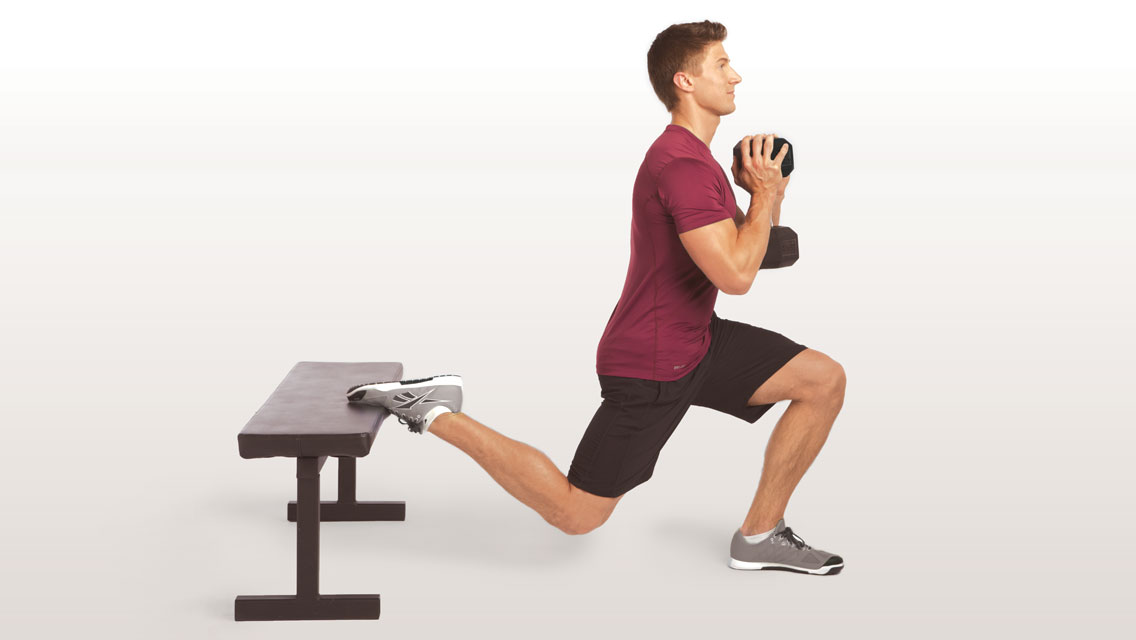
B: Front-Foot-Elevated Split Squat
Full Instructions
- Stand behind an aerobics step, a 25-pound bumper plate, or another sturdy surface elevated about two inches off the floor.
- Place one foot on top of the platform, making sure it’s securely planted.
- Step your back leg behind you about 2 to 3 feet. Don’t try to place this foot directly behind the other; align each foot to its respective hip (think railroad tracks, not tightrope).
- Bend your front knee and lower your back knee, very gently tapping it on the floor.
- Drive through your front foot to raise your body up and straighten your legs.
- Complete all reps on one side, then repeat with the opposite leg elevated.
Modification: Add weight by holding a dumbbell in each hand. As you build mobility and strength, you can increase the height of your step or elongate your stance, as comfort and control allow.
C1: Hack Squat With Back on Foam Roller
Full Instructions
- Stand with your back to a wall and position a foam roller between your lower back and the wall.
- Maintaining contact with the foam roller, bend your knees and hips to squat down until the foam roller reaches your shoulders.
- Reverse the motion, pressing down through your feet to stand back up. Keep your torso locked in an upright position to “ride” the foam roller down and up.
Modification: Add weight by holding dumbbells or kettlebells at your sides. If hip or ankle immobility limits your range of motion, place a wedge under your heels to slightly elevate the backs of your feet; remember to press through your entire foot (balls and heels) as you perform the movement.
C2: Heavy Kettlebell Swing
Full Instructions
- Stand with your feet about shoulder width apart and a kettlebell 1 to 2 feet in front of you. Hinge at the hips to reach down and grasp the kettlebell.
- Tip the kettlebell handle toward you. With your core engaged and lower back flat, quickly hike the kettlebell backward, high between your legs.
- Reverse the movement by forcefully driving your hips forward. Contract your glutes to come to standing as the kettlebell swings out in front of you to about face height. Make sure your shoulders are stacked over (not behind) your hips
- Engage your lats once the kettlebell reaches its apex to push it back between your legs. Make sure the triangle shape formed by the kettlebell’s handle and horns is completely above knee height.
- Complete the total number of reps, then “park” the weight in front of you with control.
D: Standing Banded Hip External Rotation
Full Instructions
- Secure a handled resistance band around a squat rack or sturdy pole at about waist height.
- Step away from the anchor point until there is slight tension on the band. Turn away from the band and angle your body so your left side is slightly behind the anchor point.
- Hold the end of the resistance band with both hands, arms extended. Position your feet shoulder width or wider apart.
- Rotate your hips to the right, away from the anchor point. Allow your right knee to bend and pull on the band as you rotate. Keep the focus on the upper glute of your left leg and avoid twisting through the abdominals. This might feel reminiscent of a golf or baseball swing.
- Return to the starting position with control.
- Complete all reps on one side, then switch sides and repeat.
Full Schedule
Day 1
Exercise |
Week |
||||||||
| 1 | 2 | 3 | 4 | 5 | 6 | 7 | 8 | ||
| A | Heels-Elevated Pause Squat | 3 x 12 | 4 x 12 | 3 x 10 | 4 x 10 | 3 x 8 | 4 x 8 | 3 x 6 | 4 x 6 |
| B | SL Bulgarian Deadlift | 2 x 12/side | 2 x 12/side | 2 x 10/side | 2 x 10/side | 2 x 8/side | 2 x 8/side | 2 x 6/side | 2 x 6/side |
| C1 | Barbell Hip Thrust | 3 x 12 | 4 x 12 | 3 x 10 | 4 x 10 | 3 x 8 | 4 x 8 | 3 x 6 | 4 x 6 |
| C2 | Seated Banded Hip Abduction | 3 x 12–20 | 4 x 12–20 | 3 x 12–20 | 4 x 12–20 | 3 x 12–20 | 4 x 12–20 | 3 x 12–20 | 4 x 12–20 |
| D | Frog Bridge | 2 x 30 | 2 x 30 | 2 x 30 | 2 x 30 | 2 x 30 | 2 x 30 | 2 x 30 | 2 x 30 |
Day 2
Exercise |
Week |
||||||||
| 1 | 2 | 3 | 4 | 5 | 6 | 7 | 8 | ||
| A | Romanian Deadlift | 3 x 12 | 4 x 12 | 3 x 10 | 4 x 10 | 3 x 8 | 4 x 8 | 3 x 6 | 4 x 6 |
| B | Front-Foot-Elevated Split Squat | 2 x 12/side | 2 x 12/side | 2 x 10/side | 2 x 10/side | 2 x 8/side | 2 x 8/side | 2 x 6/side | 2 x 6/side |
| C1 | Hack Squat With Back on Foam Roller | 2 x 15–20 | 3 x 10–12 | 2 x 15–20 | 3 x 10–12 | 2 x 15–20 | 3 x 10–12 | 2 x 15–20 | 3 x 10–12 |
| C2 | Heavy Kettlebell Swing | 2 x 8–15 | 3 x 8–12 | 2 x 8–15 | 3 x 8–12 | 2 x 8–15 | 3 x 8–12 | 2 x 8–15 | 3 x 8–12 |
| D | Standing Banded Hip External Rotation | 2 x 10/side | 2 x 10/side | 2 x 10/side | 2 x 10/side | 2 x 10/side | 2 x 10/side | 2 x 10/side | 2 x 10/side |
How to Choose Your Weights
When selecting weights, go with something that’s challenging — but not impossible — to lift with good form for the prescribed number of reps. If an exercise is new to you, start conservatively. For the first week, choose weights that you can handle easily. Then, add weight based on your experience in previous workouts and to accommodate the decreasing number of reps every two weeks.
Let’s take Day 1, A as an example: Perhaps in Week 1 you performed the Heels-Elevated Pause Squat with relative ease and great form using 95 pounds. In Week 2, you can try adding 10 pounds; this and performing four instead of three sets will increase the overall challenge.
Then, in Week 3, when the total number of reps decreases, you might try adding another 10 pounds (or more) to make the lower reps more challenging. In Week 4, you might keep the weight the same as the prior week, because you’ll be doing an extra set. Or you might feel really strong and increase the weight incrementally as you work through the sets.
As you can tell from this example, weight selection requires listening to your body; terms like “heavy,” “medium,” and “light” are relative to your level of strength. Focus on form and heed your body’s wisdom along with the following basic guidelines:
- Choose a heavy weight for rep counts fewer than eight.
- Choose a medium weight for rep counts of eight to 12.
- Choose a light weight (or use your body weight) for rep counts of 15 or more.
Interested in doing this workout?
Access it now on the Life Time app.
Simply open the app, go to Explore, and find Workouts & Programs to enroll.


Comments (1)
Appreciate such detailed instructions, and the videos are really clear. Looking forward to trying this routine out! Wondering if people with knee pain might need any modifications? Looking at the Front-Foot-Elevated Split Squat as a possible source, but haven’t tried it yet.