You might have seen fellow gym-goers tossing medicine balls, hopping on and off boxes, and bouncing over hurdles. These are examples of plyometric exercises, and you don’t have to be an Olympic high jumper or an elite-level sprinter to reap their benefits.
This type of training can help improve any golfer’s swing, runner’s gait or tennis player’s agility by developing the kind of elastic strength that makes you more resistant to injury, more efficient in movement and less apt to tire.
Plyometric exercises do this by training the muscles’ “stretch-shortening cycle.” These exercises emphasize the eccentric (EE-sentric), or negative, movements that occur as a muscle puts on its “brakes.” To picture this, imagine jumping off a box. When you land, your knees bend slightly as the muscle fibers in your legs simultaneously lengthen and contract to absorb the shock – this is the eccentric phase of the cycle. (To discover the benefits of eccentric training, read “Put the Weight Down!”.)
During this braking process, the muscles store elastic energy like a stretched slingshot. Plyometric training helps you release this elastic energy before it dissipates (which it will, if the delay is too long) and combine it with the next phase of this cycle: the concentric movement, when the muscle contracts and shortens.
Training your neuromuscular system to exploit this elastic “rebound” generates greater power. Athletes trained with plyometrics achieve their highest jumps after dropping from an elevated platform and “bouncing” off the ground. An untrained person, on the other hand, usually leaps higher from a standing jump.
With all jumping exercises, you want to sharpen your reflexes and minimize energy-wasting delay between landing and takeoff. Ground contacts should be touch and go. “Think of the body as a hard rubber ball,” says Vern Gambetta, a leading authority on functional sports training and former conditioning coach for several professional baseball and soccer teams. “You want to be as bouncy and as elastic as possible.”
But before you begin bouncing all over the place, a caveat: Plyometrics is an advanced fitness program meant to augment other forms of training. You should be in good condition and should strength train regularly before starting a plyometrics program.
Gradual progression is vital, too. Jumping into these exercises too quickly can leave you with sore muscles or more serious injuries. Many trainers insist on starting with a few weeks of basic jump training before introducing box jumps and hurdles. (For instructions on a few of these exercises, see “Jump to It“.)
“Even when we work with high-level athletes who just came off a successful championship season, we start over again at the beginning,” says James Radcliffe, head strength and conditioning coach at the University of Oregon in Eugene and coauthor of High-Powered Plyometrics.
Before attempting any plyometric exercise, you should warm up by doing some light aerobic exercise to raise your core body temperature and break a slight sweat. (To get more tips on how to warm up properly, see “Gradual Is Good” in the March 2007 archives.) But don’t warm up so much that you get tired. “You need to establish muscle memory, or neuromuscular patterning, while the body is fresh,” says Donald Chu, PhD, author of Jumping Into Plyometrics (Human Kinetics, 1998). “Once the body is fatigued, it tends not to adapt in the same way.”
Ready to get started? Consider the following exercises your formal introduction to Elastic Energy 101.
Elastic Essentials
Beginners should aim for three or four sets of 10 reps for each exercise. The emphasis should be more on form and speed than volume, height or distance of jumps. Allow yourself a few minutes between sets to recover fully. “Our motto is quality over quantity,” says Radcliffe. “Technique and rate of execution are the main things.”
Medicine Ball
Equipment Tip: The medicine ball (often known as a dead-weight ball) is a useful whole-body fitness tool. Med balls come in a variety of styles and sizes ranging from 3 pounds for single-limb exercises to 20 pounds for total-body exercises. You can find them in sporting goods stores (prices begin at about $20) and online at www.spri.com or www.performbetter.com.
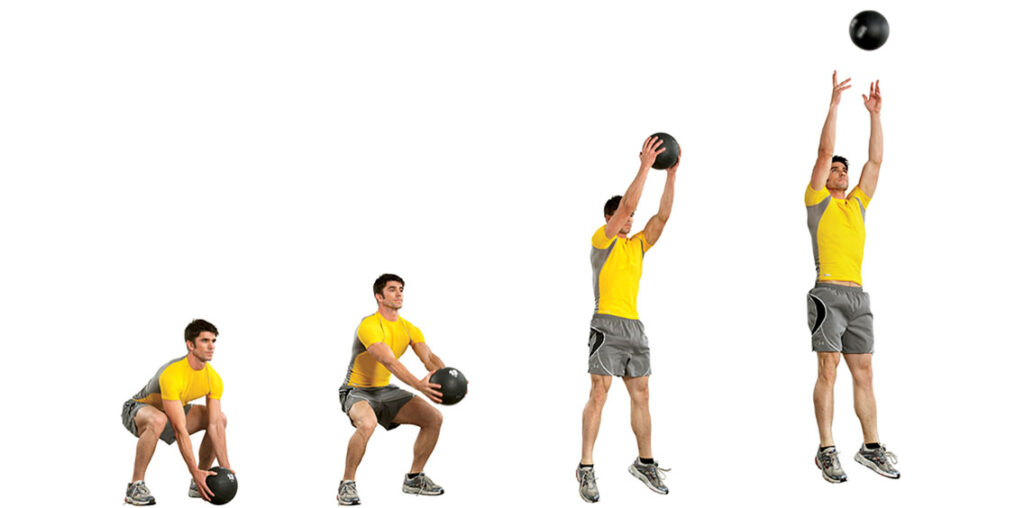
Scoop Toss

Benefits: The scoop toss encourages erect posture and helps prepare you for jumping exercises. It builds lower-body stability and follow-through, because your body actually leaves the ground when you toss the ball.
Procedure: Place the medicine ball between your feet. Drop into a semi-squat stance and grasp the ball with spread fingers. Keep your head up and back flat. As you jump out of the squat, thrust your hips forward and scoop the ball upward. Keep your arms fully extended and don’t bend your elbows. Aim for maximum height off the toss. The movement should be so explosive that your feet lift off the ground as you release the ball. Let the ball fall to the ground and repeat.
The Box
Equipment Tip: Fitness boxes are one of the most basic, effective plyometric tools for developing explosive speed. Generally, they’re anywhere from 6 to 42 inches high and cost $70 to $350 each. You can buy them online at sites such as www.spri.com, www.performbetter.com or www.power-systems.com. You also can substitute an aerobics step or solid platform. Again, don’t start jumping off the box until you have established a foundation of jumping exercises on the ground.
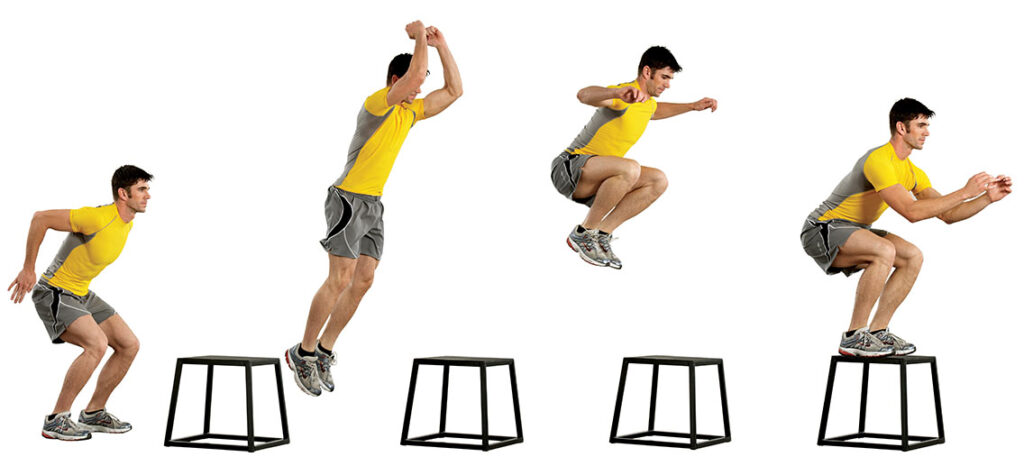
Single-Response Box Jump

Benefits: This exercise is a good introduction to the box because you’re jumping onto it, not off of it, thus causing less impact stress and sharpening your reactions (because you have to prepare quickly for landing). It also teaches you to master single jumps before you progress to sequential ones.
Procedure: Stand at arm’s length away from the box with feet hip-width apart. Lower your body into a semi-squat position, cock your elbows back at a 90-degree angle, and then explode off the ground by extending your hips and legs and swinging your arms upward. Concentrate on staying upright to avoid the tendency to drop your shoulders forward as your knees come up.
Keep your toes pulled upward so the whole foot contacts the surface of the box at once – don’t just land on your toes. Keeping the feet flexed makes the legs “spring-loaded” for quicker takeoff and minimizes stress on the feet, ankles and knees. Step down from the box and repeat.
Hurdles
Equipment Tip: Hurdles are another useful plyometric tool because they train you to clear barriers repeatedly and jump for both vertical and horizontal distance. Barriers range from 5 to 42 inches high and cost from $10 to $100 each. You can buy them online at sites such as www.spri.com, www.performbetter.com and www.power-systems.com. You also can make your own barriers by attaching dowels to the tops of cones.
Side Hop

Benefits: This exercise enhances the lateral power of the legs and hips – particularly useful for sports requiring side-to-side movements, such as tennis, ice-skating or Rollerblading. In addition, this exercise develops proper takeoff and landing mechanisms and requires you to maintain form over several barriers. It also emphasizes a strong, speedy knee lift necessary for developing quickness.
Procedure: Place two hurdles or cones about 3 feet apart. Stand with feet hip-width apart and the hurdles at your side, so you face 90 degrees away from the direction you will jump. Cock your arms back, squat slightly, and then leap sideways. As soon as you become airborne, tuck your knees and heels toward your torso as you clear the first barrier, and drop them back down as you prepare to land between the hurdles with full-foot contact.
Immediately leap over the second hurdle, then change direction and repeat the other way. Think “nose over toes” to keep your body vertical.
Hop to It!
As you practice, keep in mind that the goal is to get sharp, not tired. Because of the energy systems your body uses, doing these exercises past the point of fatigue may do more harm than good. The eccentric movements are especially taxing on your body, so you should allow at least 48 hours between sessions.
Ideally, a plyometrics program should be tailored specifically to your current condition and goals. For a comprehensive program, talk to your trainer or consult the books and DVDs mentioned in Resources, below. The great thing about plyometrics is that even a little goes a long way. “The beauty of these exercises is that you become more efficient in terms of your quickness off the ground,” says Radcliffe. In other words, you might consider plyometrics your launching pad to better athletic performance.
Bonus Exercises
Medicine Ball Exercise 2: Twist Toss
Benefits: The twist toss is useful for people who practice sports that require rotation, such as golf, softball or tennis. It sharpens the rapid cocking countermovement of the torso and trains your core muscles to add power to your swing. It also builds coordination because you must play catch with a partner.
Procedure: Stand a few feet from a partner side-to-side and facing opposite directions. Hold a 9- to 15-pound medicine ball at waist level. Keep your knees slightly bent and feet just wider than shoulder width. Begin by rapidly twisting your torso in the opposite direction that you intend to toss. Abruptly twist toward your partner and throw the ball. Your partner catches the ball and repeats the throw. Begin with gentle throws and gradually work up to more forceful ones. Concentrate on rapid, reactive motions, using your hips to assist your arms. If you don’t have a partner, you can throw the ball against the wall.
Box Exercise 2: Multiple-Response Box Jump
Benefits: This exercise builds upon the skills in the exercise described in the print version of this article, but requires a more coordinated sequence (hence the term “multiple response”).
Procedure: Jump onto the box as you would when doing a single-response box jump, but this time, immediately jump backward to the starting position and repeat the sequence. Concentrate on minimizing contact time with the ground and maintaining good hip projection. “Always land ready to jump again immediately,” says James Radcliffe, head strength and conditioning coach at the University of Oregon in Eugene and coauthor of High-Powered Plyometrics (Human Kinetics, 1999). “This cushions the landing using the natural tension of the muscles.”
Hurdle Exercise 2: Double-Leg Hop
Benefits: This exercise develops proper takeoff and landing mechanisms and requires you to maintain form over several barriers. It also emphasizes a strong, quick knee lift — necessary for developing quickness. Hopping over a cone or hurdle forces you to lift your legs up and over the barrier.
Procedure: Stand with three to five hurdles in front of you, spaced about 3 feet apart. Assume a relaxed position with arms at your sides and knees slightly bent. Squat slightly and then explode into a quick countermovement jump, fully extending the hips to attain maximum height. As soon as you become airborne, tuck your knees and heels toward your torso as you clear the hurdle or cone and drop them back down as you prepare to land with full-foot contact. Pause briefly to reset in the original position and continue over the rest of the hurdles. As you become more adept, you can reduce the pause between landing and jumping until it becomes almost instantaneous.
This article originally appeared as “Elastic Energy” in the June 2007 issue of Experience Life.


This Post Has 0 Comments