Low back pain (LBP) is one of the most common issues many people deal with today. In fact, as a fitness professional, it’s rare to meet with a potential client who hasn’t experienced LBP at some point in their life. For some, it’s a chronic issue that affects their day-to-day life. (If this is the case for you, seek out a licensed physician who can perform an assessment.)
So what causes low back pain? Unfortunately, there isn’t a simple one-size-fits-all answer.
You can, however turn things around by following a solid program that incorporates intentional daily movement, as well as changing a few daily habits.
When it comes to movement, good technique when exercising, lifting heavy objects, and going about day-to-day life is critical to maintaining a healthy lower back. While this article will not detail specific technique for all movements, the concepts and exercises provided can carry over to many of the activities of daily living.
This article will dive in to specifics about how the core, hips, upper back, and feet can play into your low back issue. After some brief discussion on how each of these affects movement, and therefore low back pain, we will provide a quick self-assessment to see if you should address the area.
Keep in mind that these assessments are meant to allow you to do some investigating at home; the content in this article is not meant to be used to diagnose issues. If you were in an accident or suffered an injury, consult with your healthcare provider or physician. Think of this content as clues about what fitness professionals might look for when they are learning how you move.
Once you’ve identified your starting point, we’ll offer a few daily habits to support the areas of need. Along with that, there will be a daily series of exercises that can help you get on the road to recovery. They will take no more than five to 10 minutes and can be used as a break within your day.
All you will need to complete each daily series is a foam roller, something like lacrosse ball (only for the foot-related daily series), and some open space.
Finally, in each section, you’ll find out how you can integrate what you’ve learned into your exercise routine.
To cap all of this off, we will provide a strength-training plan that is complimentary to everything we discussed. It’s designed to be safe and effective for everyone to complete, regardless of how your quick assessments turn out. You’ll get better results if you follow the strength-training program in conjunction with the daily habits and series.
Before addressing the other physical factors that can affect the low back, let’s discuss the importance of breathing.
Your Breathing Pattern
Breathing — the thing you’ve been doing literally your entire life — is a pattern. As you inhale, your diaphragm drops, and your ribs expand. Unfortunately, it’s a pattern that changes easily with the way we live our lives today.
With all-day-every-day repetition, new patterns are easily ingrained. This can lead to a host of problems (we could write a whole other article on that!). For now, let’s get in to how to breathe, specifically when you are working through the exercises that follow.
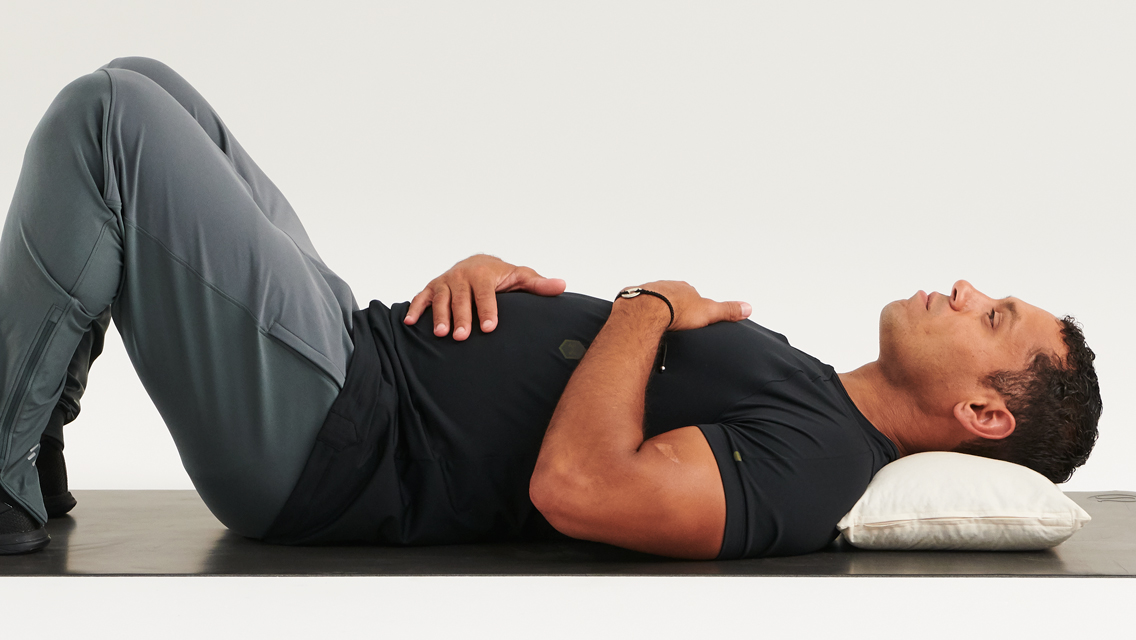
Inhale through your nose for three to five seconds. As you inhale, imagine breathing into the bottom of your belly — you should feel your ribs expanding in three dimensions as your belly expands.
Exhale for three to five seconds and allow your ribs to relax. With your ribs down, repeat the process. You may start to feel it in your core, which is the first area we’ll address.
Your Core
Think for a moment about of some the people you know who have experienced LBP — do they seem frail and weak? Probably not. In fact, some of them may be the strongest people you know.
You may also know people on the other end of the spectrum who have never exercised a day in their life, seem relatively unhealthy, and yet never complain of lower back pain.
So, what is it then?
You may be surprised to learn that your core is most likely not “weak.” If you can sit upright, stand, and walk around, you have enough core “strength” to protect yourself from LBP.
We know the core is a potential culprit behind low back pain, but it’s not its strength that is the problem. Instead, it’s likely that you do not have an optimal strategy to express your core strength. In other words, you may lack core control.
The analogy I often use here is of driving a race car: If Dale Earnhardt Jr., you, and I all jumped into race cars, there’s a good chance that he’d be driving laps around us. There’s an even better chance that we might be bumping into the track walls.
Even if all of our cars have the exact same amount of power, only Earnhardt knows how to control the power the car produces because of his expertise and experience. If we go to driving school and spend time learning how to hit the corners, we might be able to stay on the track.
We need to take our core to “driving school” so we can avoid the potential of low back pain.
The first lesson you’ll learn at core “driving school” is about alignment. For your core to do its job, your pelvis and diaphragm need to be parallel to each other. This provides intra-abdominal pressure that protects your lumbar spine (lower back).
When you aren’t in this position — such as having your ribcage out or pelvis tilted — your body will compensate by starting to ask other muscles to pick up the slack. If your body is compensating all day, problems can start to arise.
Assessment
To check whether your core control may be an issue, lie on your back with legs supported against the wall at 90 degrees (if this is uncomfortable, you may need to put a towel under your head to bolster it up). Take a few deep breaths and exhale into a relaxed position.
After a few breaths, lift one foot away from the wall a few inches. Then take a few more breaths and lift your second leg off the wall. These subtle movements should feel nice and easy. In fact, you should be able to have a comfortable conversation with someone while holding both legs off the wall.
If your body shifted during either of these movements, the core may be an area of focus for you. Some common shifts or compensations to watch for include the lower back coming off the floor, shoulders tensing up, or stomach protruding out. You’ll likely feel these immediately.
Bonus check: If you can complete the previous test, try a plank and see if you can hold it with good form for 2 minutes. If so, your core is in good shape!
Now let’s look at your habits, exercise series, and exercise integrations.
Core Daily Habits
Check for proper alignment throughout the day. The assessment you completed with your legs on the wall is the alignment we are looking for. If you start to get a feel for the position of your pelvis here, you can try to re-orient yourself throughout the day.
Practice breathing. You may have noticed that it was hard for you to follow the breathing pattern described earlier as you did the assessment. You may have elevated your shoulders or perhaps your chest and ribcage didn’t seem to move at all. In this case, practice breathing with shoulders down and an even expansion of your ribcage and belly in the test position from earlier. Once this is mastered here, you can check yourself throughout the day with a few breaths.
Core Daily Series
| Exercise | Sets | Reps |
|---|---|---|
| Foam Roller Upper Back | 1–3 | 10–12 reps |
| Dynamic Foam Roll Thoracic Extension | 1–3 | 10–12 reps at 2–3 spots |
| Breathing Reset (Supine) | 1–3 | 10–15 breaths |
| Bird Dog | 1–3 | 10–12 reps per side |
| Dead Bug Alt. Heel Touch | 1–3 | 5–6 each leg |
Notes: You may need to substitute the Dead Bug with practicing the position from the test. When you can successfully complete the test, move on to the Dead Bug.
Core Workout Integration
Transfer core position every exercise. By completing the wall liftoff test, you’ll learn how to organize your position in a way that provides ideal alignment and control. You’ll also feel the ways that proper breathing can drive this position home. Through all exercises, try to keep the pelvis and diaphragm aligned perfectly through the movement.
The strength-training program at the end will support this by putting you in the right position, but some movements will require you to think through it a little.
Your Hips
You’ve heard it — or maybe said it — 1,000 times: “My hips are tight” or “I really need to work on my hip mobility.” This often results in a poorly performed hip flexor stretch and calling it a day. But there is way more to the equation than that.
Before we get into the solutions, let’s talk a little about what may be going on.
Hip mobility is critical to curb the annoyance of low back pain. When you lack this requisite mobility in your hips, your lower back (or knees) make up for it.
Your hips move in a variety of directions and planes of motion, but there are two specific movements that have been linked to LBP: hip extension and hip internal rotation.
Assessment
The hip internal rotation is when your femur rotates inward toward your pelvis. You can test this by lying on your back with your hips and knees bent at 90 degrees. Keep your knee directly over your hip and rotate your foot outward, away from the midline. The range of motion (ROM) you’re aiming for is 20 to 40 degrees. Did you hit the mark? If not, you might need to work on hip mobility.
Next, let’s look at hip extension, or the ability to extend your leg behind you. In one study, researchers looked at range of motion in people with and without low back pain. They found that people with low back pain had -4.16 degree of ROM, while those without low back pain had 6.78 degrees.
To test where you’re at, lie near the foot of your bed with your hips near the edge. Pull one knee toward you and let the other relax and hang off the bed. Is your knee that’s hanging off your bed above or below parallel to the ground? If it’s below parallel, you are all set.
Hips Daily Habits
Change positions more often. This advice is for everyone, but it rings especially true if you identify with this section. You might stand with both feet on the floor, or stand with one foot on the floor and another on a short box (like you’re about to do a step up). If it’s not too weird, you could kneel on one or both knees. The idea here is that you are not stuck in one position for a long time. Standing is great, but if tight hips are an issue for you, too much standing in one place could lead to low back tightness.
Hips Daily Series
| Exercise | Sets | Reps |
|---|---|---|
| Foam Roll Quad | 1–3 | 30–60 seconds |
| Foam Roll Glute | 1–3 | 30–60 seconds each |
| Static Kneeling Hip Stretch | 1–3 | 60 seconds per side |
| Static Seated 90/90 Stretch (Forward Lean) | 1–3 | 30–60 seconds per side |
| Glute Bridge | 1–3 | 10–12 reps, 6-second hold |
Hips Workout Integration
Use the half-kneeling position. This position is a great way to add a hip stretch to your upper-body movements. Treat the entire set up like the static kneeling hip stretch, then perform your movements. Do this for a few movements in each workout.
Squeeze your glutes. One cool trick that you can use is called reciprocal inhibition. This is just a fancy way of saying that when a muscle on one side of your body (glutes) contracts, the muscle on the other side (hip flexors) will relax. So, during your workouts, contract your glutes as you move into a lockout position, like at the top of a deadlift.
Change the way think about standing rotation exercises. Rotation exercises are a great way to train your core to transfer force from your upper body to your lower body. Also hidden within this movement is a great way to train hip internal and external rotation while your core is engaged. Think of standing cable rotations as a full-body movement, not just a core exercise.
Your Feet
Believe it or not, your feet are critically connected to your low back. A significant amount of the sensory stimulation coming from your foot sends messages to your low back. In his book Muscles and Meridians: The Manipulation of Shape, movement expert Phillip Beach writes:
“The most vulnerable spinal segments are found at the conjunctional area of the lumbar spine and the sacrum (L4/ L5, S1) which send their sensory spinal nerves down to the sole of the foot, i.e. the vulnerable segments are driven by the most information. This is important. The small muscles of the low back are thus segmentally related to the soles of the feet. Information drives all systems so here we have a sensory platform (the soles of the feet) devoted to the most vulnerable region of the low back.”
Why is this an issue? Most of us spend most of our days with our feet in a sensory deprivation chamber — more commonly known as shoes. Shoes are great as a simple source of protection from sharp objects, but these days they are primarily built for style and comfort. This dampens the sensory information coming through your foot.
Even if you aren’t experiencing low back pain, being barefoot more often is important. While there isn’t an exact assessment to see how much sensory input you’re getting from your feet, you can look at how your foot muscles are working to give us a clue.
Assessment
Sit with your bare feet on the floor and look at your arches. Make note of the shape and overall height.
Now stand up and notice how your foot placement changes. Did your arch disappear? If so, this is a sign that under a non-weightbearing scenario (sitting), the muscles in your feet are strong enough to hold an arch; if your feet can’t hold the arch when you stand up, it’s an indicator that those muscles can’t maintain the correct position.
Before we move on, it’s important to note that there will be a decent percentage of people who have flat feet while just sitting in the chair. By default, they do not pass the test. So what do they do? It’s a little more complicated at this point.
The question I always ask clients is, “Have your feet always been flat?” If the answer is yes, it may have something to do with the structure of their bones in their foot. If not, it tells us that the foot musculature has weakened over time. Dedicated work can get things turned back on in the feet.
It’s also important to look at your kneecaps when your arch collapses: Do they point in? If so, you’ve lost alignment in your knees and hips. Just as with the core, when we lack alignment in our hips, the body starts looking to other muscles to kick in some support.
Again, it’s important that your body knows how to do this in times of need, but if you are stuck in the position all day, things can get ugly.
Bonus check: When sitting down, can you raise just your big toe without raising the lateral four? What about the opposite? Big toe down, lateral four up? What about spreading your toes apart? If not, these are simple little exercises to do while sitting at your desk or watching TV that can help activate the foot muscles.
Foot Daily Habits
Be barefoot more often. Shoes essentially remove sensory information that the bottom of your feet can provide to the rest of your body. Whenever possible, let your feet out to play. Be progressive in the amount of time you spend barefoot: Just as with the rest of your muscles, start small and progressively increase volume here.
Roll your feet at work. If you can do it without stinking up the entire office (seriously, don’t be that person), pop your shoes off during the day and roll your feet on a lacrosse ball under your desk. A few short sessions a day can go a long way.
Foot Daily Series
| Exercise | Sets | Reps |
|---|---|---|
| Lacrosse Ball Rolling | 1–3 | 30–60 seconds each |
| Foam Roll Anterior Tibialis | 1–3 | 30–60 seconds |
| Foam Roll Calf | 1–3 | 30–60 seconds per side |
| Dynamic Ankle Mobility Calf Stretch | 1–3 | 10–12 reps per side |
| 1-Leg Romanian Deadlift | 1–3 | 10–12 reps, 6-second hold |
Foot Workout Integrations
Use the short foot posture for upper -and lower-body movements. Short foot posture is essentially putting your foot in a solid arched position. To get into this position raise your big toe up as far as you can. When you do this, you should see in an increase in your arch. Now, think about gripping the floor between the ball of your big toe and your heel.
When you set your toes down, try to maintain this position. One trick to remind yourself here is to put a pen under your arch. Once you have the position down while barefoot, replicate it with your shoes on during your workouts. Most fitness facilities have rules about having shoes on while on the fitness floor.
Your Upper Back
By now, you probably get the bit. When a specific part of your body is not able to do what it’s supposed to, other regions or joints make up for it. It’s no different when it comes to your upper back (thoracic spine), which needs to extend and rotate.
Say you’re driving down the freeway and the person in front of you is going under the speed limit. As you start the process of passing them, you check your review mirrors and then your blind spot. The rotation that comes from your upper back when doing this is exactly what we are talking about. If you lack the ability to rotate your upper back, both your neck and your lower back may over-rotate to make this movement happen.
Thoracic extension is another important movement of the upper back. It’s one of the keys to getting your arms overhead. If you are reaching for the top shelf or doing a compound movement, like a shoulder press, you need thoracic extension to get full range of motion. Don’t have it? Your body will most likely find it in your lower back.
It’s important to note that full rotation may be hard to achieve if your upper back is flexed. Because of this, our quick assessment to check rotation to cover this section.
Assessment
Lie on your side with your top knee/hip bent at 90 degrees and resting on a foam roller. Take a deep breath and, as you exhale, rotate your top shoulder back toward the floor.
As you rotate, bring your top arm back like you are drawing a bow string. Rotate as far as you can or until your top shoulder hits the floor. If you can get to the floor, you are all set on rotation and likely extension as well.
Upper Back Daily Habits
Sit tall. This probably comes as no surprise, but ensuring you have a proper desk setup is key. One hack that I use is ensuring my monitors are at the right height. Same goes for driving in the car: Use your mirrors as a reminder to sit tall by setting them up for proper angles for good posture. If you notice when you check your mirror that the view is a little off, sit up and you are good to go.
Check your blind spot. Pretend you are checking your blind spot and rotate through your upper back both directions a few times a day. This will feel amazing if you have been stuck in the same position for a while.
Upper Back Daily Series
| Exercise | Sets | Reps |
|---|---|---|
| Foam Roll Upper Back | 1–3 | 30–60 seconds |
| Dynamic Foam Roll Thoracic Extension | 1–3 | 10–12 reps at 2–3 spots |
| PVC Kneeling T-Spine Mobilization | 1–3 | 10–12 reps per side |
| Dynamic Foam Roll Side Lying Thoracic Reach | 1–3 | 10–12 reps per side |
| Foam Roll Wall Pillar Bridge | 1–3 | 10–12 reps, full exhale at top |
Upper Back Workout Integrations
Learn how to resist rotation first. One of the most common misses we see in core training is the lack of anti-rotation, or the ability to resist rotation. If you can teach your body to resist a motion with the proper alignment and breathing, it will feel more comfortable controlling that motion through an entire range.
Use angled presses and pulls. If you lack the requisite mobility to get your arms overhead, your body will compensate by getting extra extension out of your lower back. This may lead to back, shoulder, or neck pain and cause you to stop lifting overhead altogether.
This isn’t completely necessary: You can get close by pressing and pulling at an angle. For overhead pressing, use a landmine. With pulling, you can kneel and use a cable. The added benefit to these movements is that it trains thoracic extension.
The Strength-Training Program
Even if you spend all day aiming to follow the habits and daily series outlined above, strength training drives it all home. Gaining strength seems to be “corrective,” while also making other fitness-related actions easier.
One comparison I offer to my clients is to think of strength as a cup: Everything that fits inside are the outcomes you desire to gain from fitness, including speed, agility, power, fat loss, and many others. The bigger the cup, the more you can fit inside. So, let’s start by getting a bigger cup.
There’s more to the story, though. When we are dealing around pain, we need to work around it.
If you struggle to control your core, for instance, we can put you in a position to maintain alignment while ensuring you are executing the breathing patterns we covered. If your feet collapse when you stand up, we can train the short foot posture. If your hips aren’t mobile, we’ll add a hip stretch into your upper-body pushing and pulling movements.
All these little tips and tricks will allow you to effectively strength train around the pain. As you progress, you can move to more difficult positions.
Before we get into your training sessions, let’s talk about a few guidelines to ensure we execute this properly.
- If it hurts, don’t do it. It may seem a little crazy that we need to provide this a guideline, but when it comes to exercise, many people think it’s OK to push through pain. The “No Pain, No Gain” adage is the opposite of how we should be thinking. The body is a master of compensation. When we start working through pain, other muscles will compensate, and we won’t maximize the benefits of the exercise. So, if it hurts, don’t do it.
- Carry over your exercise integrations. Each exercise integration offered above is key to ingraining the proper movement and postures into your brain. Be diligent about keeping these in order, even if they feel weird. For example, if you’re dealing with a foot issue, we want you to pay attention to this even when doing upper-body movements.
- Form is key. Throughout the article, we provided demonstration videos that you can watch to ensure you are hitting the key points. Review these before each session. If you can’t do them with proper form, don’t do them.
- Check your pride at the door. This isn’t the time to be crushing PRs, trying to outlift your friends, or pushing every set to failure. Be progressive by increasing the load week-over-week, but leave a few in the tank. As a rule of thumb, stop each exercise when you have two to three reps left. If you could get 15, stop at 12. Each week, you should be able to do a few more reps or add a little weight.
The strength-training plan that follows is broken down into three total body training sessions per week. It’s recommended that you take a least one day of rest in between session. The plan is set for Monday, Wednesday, Friday, but adjust as needed. If you are a Life Time member, you can follow along and track your program on the Life Time app. Click here to add the program to your account.
Warm Up
You’ll notice that there is a significant warm-up or movement prep. This is intentional to ensure you are getting everything in order before the actual lifting starts. You may recognize a few movements from your daily series mentioned above. It won’t hurt to do them again. It seems like a lot, but it you’re only going through each movement one time. Think of this as admission to get into the workouts. It should take you 10 to15 minutes.
| Exercise | Sets | Reps |
|---|---|---|
| Dynamic Foam Roll Thoracic Extension | 1 | 10–12 reps |
| Foam Roll Glutes | 1 | 30–60 seconds |
| Foam Roll Quad | 1 | 30–60 seconds |
| Breathing Reset (Supine) | 1 | 10–15 breaths |
| Static Kneeling Hip Stretch | 1 | 30 seconds each |
| Dynamic Ankle Mobility Calf Stretch | 1 | 10–12 reps each |
| Mini Band Hip Thrust | 1 | 10–12 reps (6–second hold at top) |
| Dead Bug Alt. Heel Touch | 1 | 5–6 reps per leg |
| Dynamic Seated 90/90 (Hands) | 1 | 10–12 reps each |
| Air Squat | 1 | 10–12 reps |
| Foam Roll Wall Pillar Bridge | 1 | 10–12 reps |
Each strength-training session is comprised of two main circuits and a bonus circuit. Complete two to three sets of each of the main circuits; if you have the time and are still feeling solid, add the bonus on the end.
Circuit Set Up: Complete all exercises within each circuit. When you finish the last exercise, rest for 60 seconds, then repeat the circuit from the beginning. Complete the desired number of sets before moving on to the next circuit.
Equipment Need: This program is designed for a fitness center that has dumbbells, cable machines, and resistance bands. If you’re working out at home, you can perform all cable exercises with a simple set of resistance bands. It will also be really beneficial to add mini bands to your collection.
Total Body 1
| Circuit | Exercise | Sets | Reps |
|---|---|---|---|
| 1 | Kettlebell Goblet Squat | 2–3 | 10–12 reps |
| 1 | Cable Half-Kneeling Row | 2–3 | 10–12 reps each |
| 1 | Side Plank Straight Leg Raise | 2–3 | 10–12 reps each |
| 2 | Glide Disk Leg Curl | 2–3 | 10–12 reps |
| 2 | Smith Machine Pushup | 2–3 | 10–12 reps |
| 2 | Resistance Band Dead Bug | 2–3 | 10–12 reps |
Bonus Circuit
Complete if you’re feeling good. If not, no sweat.
| Circuit | Exercise | Sets | Reps |
|---|---|---|---|
| 3 | Glide Disk Dumbbell Reverse Lunge | 1–3 | 10–12 reps each |
| 3 | Cable Half-Kneeling 1-Arm Pulldown | 1–3 | 10–12 reps each |
| 3 | PVC Kneeling T-Spine Mobilization | 1–3 | 10–12 reps |
Total Body 2
| Circuit | Exercise | Sets | Reps |
|---|---|---|---|
| 1 | Kettlebell Deadlift (1-bell) | 2–3 | 10–12 reps |
| 1 | Cable Half-Kneeling Pulldown (Neutral) | 2–3 | 10–12 reps each |
| 1 | Cable Kneeling Pallof Iso Hold | 2–3 | 15–30 seconds each |
| 2 | Dumbbell Goblet Stationary Lunge | 2–3 | 10–12 reps |
| 2 | Landmine Half-Kneeling 1-Arm Shoulder Press | 2–3 | 10–12 reps |
| 2 | Dumbbell 1-Arm Carry (Farmer) | 2–3 | 15–30 seconds |
Bonus Circuit
Complete if you’re feeling good. If not, no sweat.
| Circuit | Exercise | Sets | Reps |
|---|---|---|---|
| 3 | 1-Leg Glute Bridge | 1–3 | 10–12 reps each |
| 3 | Cable Half-Kneeling Face Pull | 1–3 | 10–12 reps each |
| 3 | Dynamic Straight Leg Quadruped Thoracic Rotation | 1–3 | 10–12 reps |
Total Body 3
| Circuit | Exercise | Sets | Reps |
|---|---|---|---|
| 1 | Dumbbell Step Up | 2–3 | 10–12 reps |
| 1 | TRX Recline Row | 2–3 | 10–12 reps each |
| 1 | Resistance Band Standing Rotation | 2–3 | 15–30 seconds each |
| 2 | Cable 1-Leg RDL | 2–3 | 10–12 reps |
| 2 | Cable Half-Kneeling 1-Arm Chest Press | 2–3 | 10–12 reps |
| 2 | McGill Curl Up | 2–3 | 3x 8–10 second hold |
Bonus Circuit
Complete if you’re feeling good. If not, no sweat.
| Circuit | Exercise | Sets | Reps |
|---|---|---|---|
| 3 | Dumbbell Goblet Lateral Lunge | 1–3 | 10–12 reps each |
| 3 | Resistance Band Pull Apart | 1–3 | 10–12 reps each |
| 3 | Calf-Raise | 1–3 | 10–12 reps |
Cool-Down
By now, you may just want to walk to the café or your kitchen, grab a shake, and get out of dodge, but I’m going to recommend you spend a few minutes on the cool-down. It’s just a few items, and I won’t even make it formal. Pick one to two of your favorite stretches or mobility drills from the daily series, warm-up, or workout and go through a couple rounds. The key is to focus on the breathing strategies outlined earlier. This will help bring your heart rate back down, which is ultimately what we are looking for out of our cool-down.
Questions & Answers
What if I failed more than one quick assessment?
You probably noticed mention of how interconnected the body is throughout this article. We are talking about low back pain and yet we spent most of our time discussing other regions of the body. So, it’s likely that you may need to work on more than one of these.
Too keep it simple, try to integrate the daily habits for each. For the daily series, it may not be realistic to work on all of them. In this case, start with the option you think will provide the greatest return. You know your body better than anyone. The caveat is if core was on your list: In this circumstance, get that situated before moving on.
I passed all the assessments and still have low back pain? What do I do?
These assessments are simply what I look for when I train clients with low back pain. They are not a replacement for a clinical assessment from a skilled practitioner. If the pain is severe, get checked out. If it’s a nagging discomfort here and there, start with the foot routine. Even if you pass the test, you may not be getting enough sensory information from your feet.
What else could help?
There are a lot of different options here. Pilates does a great job of incorporating the principals behind everything we discussed. Also, getting regular massages or other manual therapy session are extremely beneficial.
I met with a (doctor, physical therapist, chiropractor, personal trainer) and they said my low back pain was caused by ______________.
They were probably right. Being able to take someone through a live assessment makes the process of identifying the root cause 100 times easier. Did their solution work? If not, give these a try.
Will I have to do these daily series exercises my entire life?
No. As you progress, you should feel some relief. The daily series should translate into better posture and daily movements, which should keep the pain away. As you can imagine, it’s probably not a bad idea to keep some of these movements in your back pocket as daily movement hygiene.
It hurts when I do the ______ exercise. What should I do instead?
This is where it’s tough to know what’s going on, unless I can see it happening live in person. If you’re at Life Time, stop by the fitness desk and ask one of our fitness professionals to help you out. To provide a little guidance, for upper-body movements, move to the half-kneeling position. For lower-body position, stick with unilateral (one-leg) movements.
How long will it take for my back pain to go away?
This is a tough question to answer due to the degrees of variability; it also depends on your dedication to the program. I’ve seen some clients make a couple changes and notice improvements within days. Others have been battled for months before feeling better.
I have flat feet — should I get orthotics?
I’m not a huge advocate for orthotics as a long-term solution. Think of it this way: If you broke your wrist, would you keep it in a cast forever? Probably not. Think of orthotics the same way. If you need them short-term, go for it. Just make sure you are following a solid plan to get those muscles in your feet turned back on.
Should I go see a physician if I have low back pain?
Yes.