

Explore the following strength moves and their variations:
Conventional Barbell Deadlift | Overhead Press | Bench Press | Barbell Back Squat | Pull-Up | Biceps Curl
Building foundational strength is one of the best ways to stay self-sufficient and resilient for life. Squats, deadlifts, pull-ups, presses, and curls are staples in gyms and health clubs because they work multiple muscles at once while delivering powerful athletic gains and aesthetic results. But despite their popularity or established effectiveness, no lift is one-size-fits-all.
“Not every exercise is perfect for every body,” says Danny King, master personal trainer at Life Time. “Between past injuries and different body types, I find that not every standard exercise fits all of my clients. Sometimes, by trying a variation of a traditional primary lift, it’s possible to see faster results by training harder and staying healthier.”
“Even if you have had success with the traditional barbell lifts,” he adds, “variations can be a great change of pace and just the thing you need to break out of a training rut.”
In other words, opting for modifications isn’t just about making a move easier or harder — it’s about making the move better for you.
On the below, King and other top trainers share their favorite alternatives to standard strength movements, providing suggestions that might just become your new favorites.
You Know the Conventional Barbell Deadlift . . .
This popular compound movement strengthens the hamstrings, glutes, back, and core. “When we do compound exercises that use all these muscles at once, there’s so much bang for your buck and so many benefits,” says King.
If mobility is an issue, though, you could be compromising the lift’s effectiveness — as well as increasing your risk of injury, says human-performance educator Mike T. Nelson, PhD. “You might round your back, or allow your hips to pop up too fast.”
. . . Now Meet the Kettlebell Deadlift
Kettlebell deadlifts deliver benefits that are similar to the barbell variation, while helping you fine-tune your deadlift form and supporting your lower back.
To Do It Right: Stand with a kettlebell between your feet. Hinge your hips and bend your knees, keeping your spine neutral and core engaged. Grasp the kettlebell and stand up. Push through your feet, which will allow you to raise the kettlebell naturally.
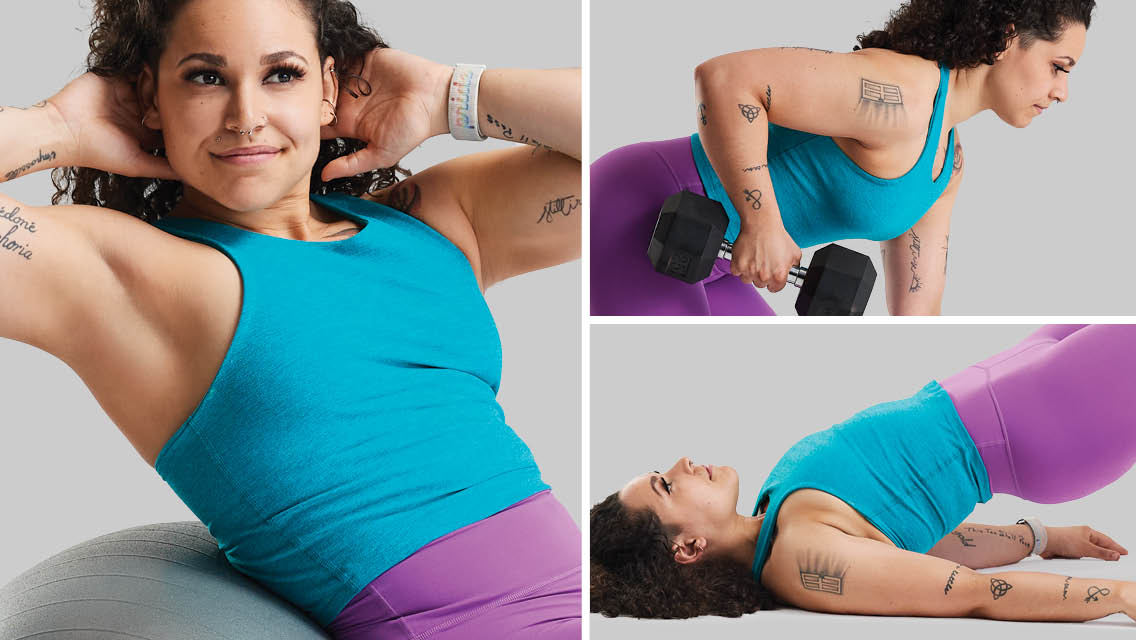
. . . and the Glute Bridge
The supine position reduces pressure on the lower back while strengthening the glutes, hamstrings, and abs.
To Do It Right: Lie face up, keeping your knees bent, your feet flat on the floor, and your arms at your sides. Squeezing your glutes and drawing in your abs, lift your hips off the floor until a straight line is formed through your shoulders, hips, and knees. Hold for five seconds before easing back to the floor. Progress the move by adding weight with a sandbag or barbell across your hips or by using the glute bridge machine (commonly known as the Glute Drive) at your health club. (For additional form tips and variations, see “BREAK IT DOWN: The Glute Bridge“.)
You Know the Overhead Press . . .
“The overhead press is an amazing shoulder exercise,” says Miller, “and being able to lift heavy objects overhead is something we need in everyday life, whether putting a heavy bag in an overhead compartment of an airplane, lifting a child in the air to play, or putting a box away on the top shelf of a closet.”
. . . Now Meet the Kettlebell Press
The great thing about the kettlebell press is that you can perform it at more of a 45-degree angle, which is safer for the shoulders and elbows than the usual 90-degree angle made with a barbell or dumbbells, says Dallas-based fitness coach Karen Smith. “And if you start single-sided, you’re going to fix any asymmetries you might have.”
To Do It Right: Hold a kettlebell in one hand (or a kettlebell in each hand) at chest height, with your elbow tucked in. Drive the kettlebell up and overhead, keeping the handle at a 45-degree angle, pressing into your palm. Slowly lower the weight and repeat, then switch sides.
. . . and the Push Press
The push press combines the overhead press with a leg drive. By initiating the move with a mini-squat, or dip, instead of straight legs, you can produce more power and lift more weight. “The push press lets you keep going with a few more reps, because your legs can help,” says Miller. “This is a great option to get the upper and lower body working as one.”
To Do It Right: Holding dumbbells (or kettlebells, or a barbell) at the height of your collarbone, lower into a half squat and use your legs to help drive the weights overhead. (Find form tips on overhead pressing at “BREAK IT DOWN: The Overhead Press“.)
. . . and the Landmine Press
The landmine refers to a barbell attachment, available in most health clubs and gyms, that allows you to press weight in a shoulder- and back-friendly arc instead of straight overhead. (If you don’t have a landmine attachment, wedge one end of a barbell into a corner.)
To Do It Right: Grip the free end of the barbell with both hands, holding it close to your chest. Press the weight away from you until both arms are fully extended. Lower the weight and repeat. (For a beginner-friendly landmine workout, check out “6 Unconventional Barbell Exercises“.)
You Know the Bench Press . . .
“How much can you bench?” may be one of the most overused gym clichés out there, says King, but the benefits are real. “It’s a great way to hit the chest and shoulders,” he says. “Anytime you’re doing bigger compound movements using a couple of different muscles, it creates a level of stability so you can push and move more load.”
The easiest modifications are to use a 45-degree incline bench or to attach bands to the barbell. “They create a little bit of deceleration, so you can push really hard.”
. . . Now Meet the Dumbbell Chest Press
Sick of benching? Try the dumbbell chest press. “It’s a true unilateral pressing exercise,” says King, because while both arms are pressing at the same time, they’re doing so independently.
To Do It Right: Holding a dumbbell in each hand, lie back on a bench, bending your elbows so the weights are level with your shoulders; face your palms toward your feet. Press the weights above your chest until your arms are straight, taking care not to hyperextend the elbows, and return the weights slowly to the starting position.
. . . and the Elevated One-Arm Pushup
You don’t have to be able to do a regular, two-handed pushup off the floor in order to get the unilateral benefits of this move thanks to the elevated modification. “If you’re doing one-arm pushups properly, you’re getting tension from your feet to your head and shoulders, your core, your glutes — everything’s involved,” says Smith.
To Do It Right: Start by doing a one-arm pushup against an incline bench or wall, keeping your core tight and your shoulder contracted, not shrugging it up toward your ears. “Against the bench you may have to begin in the bottom position with your hand next to your chest and then step back and straighten your arm — otherwise it will turn into a weird forehead push-up,” Smith cautions. Over time, lower the working hand by decreasing the incline of the bench, using a low box, or eventually moving down to the floor.
You Know the Barbell Back Squat . . .
“The barbell back squat is one of the premier compound exercises, working muscles around multiple joints in your lower body,” says Nicole Volpe Miller, a certified group fitness instructor based in Broomfield, Colo. “You’re building power and muscle in your glutes, quads, and hamstrings. You can feel all of your muscle fibers are loaded and straining. It’s a big confidence builder to push heavy weight out of a squat.”
(Avoid these common errors in the barbell back squat setup.)
. . . Now Meet the Goblet Squat
Goblet squats can sometimes be easier for those with limited ankle-dorsiflexion mobility to get to depth because the weight in front is a counterbalance, explains Miller.
To Do It Right: Stand with your feet anywhere from just outside hip width to shoulder width apart and hold a kettlebell between your hands in front of your chest. (You can also do this with a dumbbell.) Lower into a squat, keeping your knees tracked toward your middle toes. “Check to make sure your knees are not collapsing inward,” says Miller, “and that your torso is maintained as upright as possible.”
(Also, strengthen your grip and the muscles of your core, hips, and back with the Goblet March.)
. . . and the Zercher Squat
The Zercher squat builds levels of quad strength that are similar to the barbell back squat, while the upright posture challenges core stability, Nelson notes.
To Do It Right: Hold a barbell in the crooks of your bent elbows. Lower into a squat, keeping your biceps flexed, and your torso braced and upright. Drive through your feet to return to the starting position. If holding a barbell in this way is uncomfortable, try wrapping the barbell in a yoga mat or other cushioned material, or use a sandbag instead. (Try these other Zercher variations.)
You Know the Pull-Up . . .
“There’s something really empowering about being able to move and lift your own body weight,” says King. Pull-ups are a fantastic movement for your big back muscles, he adds; they counteract the “pushing” movements like the bench press that are so popular.
. . . Now Meet the Rack Pull-up
This exercise works your lats and rhomboids like a traditional pull-up but reduces some of the load to allow you to get stronger and progress toward the standard movement.
To Do It Right: Set a bar in a rack at about torso height while standing. Grasping the bar, lower yourself to the floor, place your feet slightly in front of you, and straighten your arms. With your hips below your hands, pull yourself up until your chin is over the bar, using assistance from your feet as needed. Progress this move by propping your feet out front on a bench.
. . . and the Hanging Scap Shrug
The scapulas are the shoulder bones that give us “wings,” and by improving scapular motion, we can enhance all overhead movement patterns and range of motion while avoiding pain and injury.
To Do It Right: Start in an overhand pull-up position. Hanging from the bar with your arms straight, pull your shoulders away from your ears and raise your body. Hold for one second, then return to the starting position. You’re lifting yourself up without bending your arms: Think about bending the bar instead.
You Know the Biceps Curl . . .
Biceps curls have a reputation for being all about aesthetics, which has cemented their popularity, says James Stanko, Alpha Coach at Life Time in Vernon Hills, Ill. “But curls are also a functional movement. If you have strong biceps, it’s going to be easier to pick things up and maneuver in life — we’re always pulling doors open, for example. Doing biceps-specific curls is training that movement and control pattern so you have strength for the long haul.”
. . . Now Meet the Biceps Row
Doing rows instead of curls is going to use more muscles in your back and your shoulders, says Stanko. You can use a barbell, dumbbells, or even an indoor rower with an underhand grip.
To Do It Right: Using a barbell or two dumbbells, grip the equipment at arm’s length with your palms facing away from you. Keep your core and back tight as you hinge at the hips to assume a bent-over position. Bend your elbows and draw the weight(s) up toward your hips, then extend your arms back to the start position. Make sure your shoulders are braced back and downward to keep the work in your biceps and not all in your back and shoulders.
. . . and the Plate Curl
This alternative works the biceps while also strengthening the muscles in your forearms.
To Do It Right: Choose a weight plate instead of dumbbells to perform the standard curl movement.
Weekly Progression for Intermediate and Advanced Lifters
“The longer a person trains hard and stays consistent, the more likely that taking a break from the common compound lifts like squats and bench press can accelerate results by making training more fun and novel again,” says Life Time master trainer Danny King. “It exposes your muscles to a new stress, and potentially staves off any overuse injuries.”
Intermediate lifters can benefit from following three-week waves, which allows time to adjust to the weight in each rep range.
- Weeks 1 to 3: 3 sets of 12 reps
- Weeks 4 to 6: 4 sets of 8 reps
- Weeks 7 to 9: 3 sets of 10 reps
- Weeks 10 to 12: 4 sets of 6 reps
If you’re a more advanced lifter who understands your rep maxes and how to push to fatigue on each exercise, King suggests this weekly progression. He advises adding no more than 10 percent to the working weight each week.
- Week 1: 3 sets of 12 reps
- Week 2: Add weight; 3 sets of 10 reps
- Week 3: Add weight; 4 sets of 8 reps
- Week 4: Add weight; 4 sets of 6 reps
For tips on selecting the right weight for you, visit “Expert Answers on Figuring Out How Much Weight to Lift“.
This article originally appeared as “Beyond the Basics” in the October 2021 issue of Experience Life.


Comments (1)
These are some refreshing new ideas to vary my workout. Thanks