There’s an avalanche of contradictory information out there on how to build a sexy, defined midsection. One expert tells you to do crunches till you’re blue in the face; another says to avoid them like the plague. Some say you need to work your abdominals daily; others tell you not to work them explicitly at all.
To help you get to the bottom of this (and to the abs you want), we called upon fitness experts Brad Schoenfeld, MS, CSCS, author of 28-Day Body Shapeover, and Abbie Smith, PhD, CSCS*D, CISSN, assistant professor of exercise and sports science at the University of North Carolina at Chapel Hill.
They gave us all the essentials we sought, and also outlined some great tips on how to shed unwanted fat through diet and full-body exercise.
While you’re working your way toward a more attractive torso, though, keep in mind that abs are like fingerprints: Everyone’s are different. Some folks have had visible abs practically since they were toddlers; others sweat like Olympians and never catch sight of a two-pack. So don’t fall into the trap of comparing yourself with airbrushed cover models. Shoot instead for becoming the strongest, leanest, best version of yourself that you can be.
Ab-Building Components
The workout below will build strength, improve function and firm up your ab muscles. But you still have to shed fat if you want to showcase the abs you are building. To do that, start with these two major pieces of the ab-building puzzle:
1. Eat Smart
“When it comes to great abs, diet is more than half the equation,” says Schoenfeld, whose six-pack helped him win numerous trophies as a natural bodybuilder.
But rather than jump on the diet-book bandwagon, Smith suggests you keep things über-simple: “Avoid processed foods and lower your carb intake.”
These two basic interventions can work wonders in getting you lean enough to see ab muscle, she says. Processed foods include anything that contains flours, sugars, additives, or other industrially produced ingredients. As for carbs, Smith suggests limiting your intake of the highest-carb items (like sweets, bread, pasta, rice, potatoes and other starchy foods) as much as possible. “Most people eat as much as 60 percent carbohydrate. I’m not suggesting that people eliminate carbs completely; just drop into a lower range.” One great strategy is to simply replace the items above with carbs from nonstarchy vegetables (dark, leafy greens, cauliflower and so on). You can eat all you want of those foods.
2. Go Hard
If you want to burn fat, don’t plod.
Smith’s research has shown that high-intensity interval training (HIIT) burns fat more effectively than steady-state low-intensity cardio like jogging. Great examples of HIIT include sprints (on foot or on a bike, treadmill or other cardio equipment), strength training or kettlebell circuits, barbell complexes, and other training methods that spike your heart rate while giving your muscles an intense workout. (Find examples of this type of workout by searching for “HIIT” or “interval training” in our archives.) Most people see good results doing this type of workout three to five times a week.
If the term “high intensity” gives you pause, fear not. Intensity, says Smith, is relative: “For some people, getting on a stationary bike and pedaling hard for 10 seconds, slowing down for 50 seconds, and repeating that work-rest cycle a handful of times might be all the intensity they need. As long as you’re working at a level that’s challenging for you, you’re doing it right.”
The Form + Function Ab Workout
Two or three days a week, perform each of the following four exercises as a circuit after your strength-training workout. Rest as little as possible between exercises. If you choose to do a second round, rest for one minute before you repeat the cycle. Here’s how to gear your workout:
- If you’ve been training for at least six months and feel confident with most basic free-weight strength-training exercises, including core moves, perform the exercises as indicated.
- “Make It Easier” and “Make It Harder” variations of all these exercises are available in the Web Extra. If you’re new to strength training, have minor back pain, or are coming back after a layoff of six months or more, choose the “Make It Easier” versions. If you’ve been training without interruption for at least a year, have improved your strength markedly with weight training, or participate regularly in competitive sports or outdoor activities, choose the “Make It Harder” versions.
1. Plank With Leg Lifts
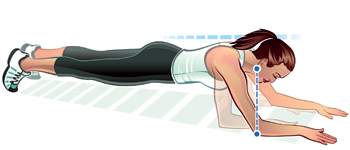
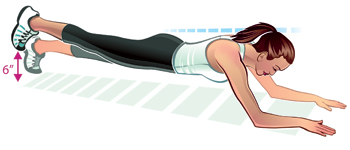
- Lie facedown on the floor.
- Prop your upper body up on your elbows and forearms.
- Press down through your elbows and the balls of your feet, extend your body, and straighten your back so it forms a straight line from your heels through the top of your head.
- Walk your elbows a few inches forward and together until they are directly below your ears (that is, several inches forward of the standard position), and leave them there throughout the exercise.
- Without bending, twisting or rotating your spine, and keeping both legs straight, lift your right foot 6 inches off the floor. Hold for 10 seconds.
- Lower your right foot and repeat with your left foot.
- Do five 10-second holds on each side, alternating legs.
The Finer Points: Before you begin the leg-lifting portion of the exercise, test for correct positioning by having a training partner place a broomstick or similar object lengthwise along your spine. The stick should touch your glutes, your midback and the back of your head. Tougher, right?
2. Swiss-Ball Dead Bug
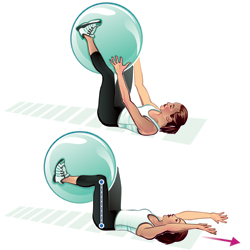
- Lie on your back, holding a small- to medium-size Swiss ball in your hands directly over your chest.
- Bracing your core and pressing your lower back into the floor, lift your legs until they point toward the ceiling.
- With your head on the floor, transfer the ball to your legs, gripping it with your lower legs and feet.
- Keeping your thighs pointed straight up, bend your knees and lower the ball until it is a couple of inches from the floor.
- Simultaneously reach and stretch your arms toward the floor over your head.
- Keeping your lower back pressed against the floor, raise your arms and legs until they are above your torso again, and transfer the ball from your legs to your hands.
- Lower your hands and feet toward the floor again, this time holding the ball with your hands.
- Bring your arms and legs back up and transfer the ball back to your feet.
- Count one rep each time you transfer the ball.
Do eight to 20 repetitions.
The Finer Points: The position of the lower back is essential. If you feel strain in your lower back, make sure to choose the “Make It Easier” version, described in the Web Extra.
3. Swiss-Ball Pike-Up
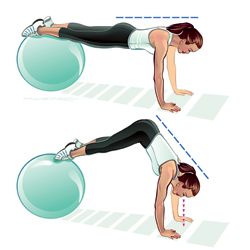
- Assume a pushup position with your feet elevated on a Swiss ball.
- Point your toes so the tops of your feet are in contact with the ball.
- Keeping your legs straight and your head, upper back and hips aligned, press the tops of your feet into the ball, raising your hips as high in the air as possible (your final position will resemble a down-dog posture with your feet on the ball).
- Reverse the movement, lowering your hips until you are again in pushup position, and repeat.
Do eight to 15 repetitions.
The Finer Points: Rather than looking back at the ball in the pike position, keep your eyes looking down at the floor the whole time.
4. Rope Crunch
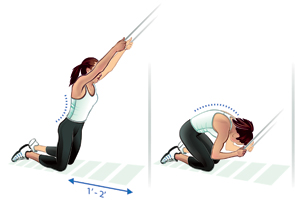
- Select a moderately heavy weight on a cable machine, and affix a rope attachment to the high pulley.
- Grasp the handles of the rope with your palms facing one another, thumb-sides of your hands toward the ceiling, as if you are doing a triceps pushdown exercise.
- Kneel and face the machine, a foot or two from the weight stack.
- Extend your arms overhead.
- Keeping your upper arms next to your ears and your lower back in its natural arch throughout the movement, exhale forcefully and contract your abs, slowly flexing your upper spine forward and drawing the front of your
- rib cage down and toward your pelvis.
- Once your abdominals are fully contracted, slowly reverse the movement and return to the starting position.
Do eight to 15 repetitions.
The Finer Points: “Don’t bring your elbows all the way to the floor,” says Schoenfeld. “You should round your upper back, not your lower back.”
Workout Modifications
1. Plank With Leg Lifts
Make It Easier: Standard Plank
- Perform the movement as described above, only without lifting your legs, and with your shoulders aligned directly over your elbows. Have a partner perform the “broomstick test” to make sure you are properly aligned.
- Hold this elevated position for the appropriate time period.
Do one or two isometric holds, working up to 60 seconds each.
Make It Harder: Pushup Hold With Forward Reach
- Assume an all-fours position on a hardwood floor (or other uncarpeted surface).
- Place your hands on two towels or, if available, two Valslides, smooth side down.
- Assume a pushup position with your head, back, and hips in aligned as described above.
- Bend your elbows slightly.
- Keeping your back straight and aligned, shift your weight onto your right hand and slowly slide your left hand forward along the floor as far as possible.
- Return your left hand to the starting position and repeat the action with your right hand.
Do one or two sets of eight to 15 reps with each hand, alternating sides.
2. Swiss-Ball Dead Bug
Make It Easier: Supine Swiss-Ball Bird Dog
- Assume the starting position described above, holding the ball above your chest.
- Keeping your head relaxed on the floor, extend your arms and legs towards the ceiling, pressing your shins and hands evenly into the ball so that it is evenly supported by all four limbs.
- Keeping all four limbs straight, release the ball with your left arm and your right leg, and lower them until they are a few inches from the floor.
- Raise your left arm and right leg until you can grip the ball between them and repeat the movement, this time lowering your right arm and left leg towards the floor.
Do one or two sets of eight to 20 reps with each leg.
Make It Harder: Straight-Leg Swiss-Ball Dead Bug
• Perform the movement as described, this time keeping your legs straight throughout the entire movement. Keep your lower back pressed towards the floor throughout the movement.
3. Swiss-Ball Pike-Up
Make It Easier: Jackknife With Knees on Ball
- Start in the pushup position, again with your legs elevated, but place your upper shins, rather than your feet, on the Swiss Ball.
- Draw your knees in as far as possible towards your chest, lifting your hips as you do so.
- Extend your legs, lower your hips and return to the starting position.
Do one or two sets of eight to 15.
Make It Harder: Swiss-Ball Rollout/Pike-Up
- Begin in the pushup position, feet on the ball.
- Keeping your arms and legs straight, your hips, head, and upper back aligned, and your lower back in its natural arch, push yourself backwards with your arms so that your legs roll farther up and onto the ball.
- Reverse the movement and return to the starting position.
- Perform the Pike-Up as described above, and return again to the starting position.
Do one or two sets of eight to 15.
4. Rope Crunch
Because you’re using external resistance in this exercise, it’s easy to control the intensity: If you want to Make It Easier, take some weight off; to Make It Harder, add a plate or two.
Resolving the Crunch Controversy
Crunches have been much maligned in the last few years (in this magazine, among other places), mostly in response to research suggesting that repeatedly flexing your spine forward — as crunches demand — can damage vertebral discs. Many trainers took this as a cue to banish crunches from training altogether. But should you?
Well — maybe. For one thing, crunches aren’t very functional, particularly when you perform hundreds of repetitions, as some zealous gym-goers do. “I can think of very few sports or activities where you’d need to do that over and over, so why train like that?” asks Brad Schoenfeld, MS, CSCS, founder of www.lookgreatnaked.com.
Bottom line: If you’re crunching like your life depends on it, you may be doing yourself more harm than good. If you’re not ready to abandon crunches completely, doing a few here and there won’t hurt you, and if you do them properly, they will help build strength and definition. Stick with two or three sets a few times a week, and keep your reps in the eight to 15 range. If you find that too easy, add some resistance (holding a medicine ball against your chest, for example).


This Post Has 0 Comments