

Recipes in this collection:
Dark Chocolate Yogurt Dip
Sliced fruit is the perfect accompaniment to this chocolaty yogurt dip. Serve with dinner or as a healthier dessert alternative.

Makes 2 cups | Prep time 5 minutes | Cook time 10 minutes
- 4 oz. dark chocolate (70–80 percent cacao), coarsely chopped
- 1 ½ cups plain, full-fat Greek yogurt
- ½ tsp. vanilla extract
- ½ tsp. raspberry, almond, or other extract (optional)
- Make a double boiler by pouring an inch of water into a medium pot and placing a metal bowl on top, covering the opening but not touching the water. Bring the water to a boil, then reduce to low. Place a folded towel on the counter.
- Place the chopped chocolate in the bowl and stir gently until melted and smooth. Place the bowl on the folded towel and quickly add the yogurt, vanilla, and other optional extract, then whisk to mix well.
- Transfer to a storage tub and chill or serve at room temperature with sliced fruit for dipping.
This recipe originally appeared in “6 Delicious Dips.” Photo by: Andrea D’Agosto; Prop Styling: Alicia Buszczak; Food Styling: Paul Jackman.
Avocado Chocolate Mousse With Cacao Nibs
This luscious dairy-free chocolate mousse is made with avocados, full-fat coconut milk, maple syrup, and dark chocolate.

Makes 6 servings | Prep time 15 minutes, plus chilling time | Cook time 0 minutes
- 4 large ripe avocados
- ¼ cup cocoa powder
- 1 tbs. vanilla extract
- ¼ tsp. salt
- ½ cup maple syrup
- ¼ cup canned full-fat coconut milk
- 3 oz. dark chocolate, coarsely chopped
- 3 tbs. cacao nibs
- In a food processor, place the avocado flesh and purée until completely smooth, scraping down the sides as needed. Add the cocoa powder and process to mix. Add the vanilla, salt, maple syrup, and coconut milk and process again until combined.
- Bring a small saucepan of water to a gentle boil.
- Place the chocolate in a small bowl and set the bowl over the boiling water to use it as a double boiler to melt the chocolate. Stir occasionally until the chocolate is completely melted.
- Allow to cool to room temperature, then scrape the chocolate into the avocado mixture. Purée until combined.
- Transfer to an airtight container and cover with plastic or beeswax wrap, pressing it to cover the surface of the purée.
- Seal the container and chill until cold.
- Serve a heaping half cup topped with half a tablespoon of cacao nibs.
This recipe originally appeared in “9 Healthy Recipe Substitutions.” Photo by: Andrea D’Agosto; Prop Styling: Alicia Buszczak; Food Styling: Paul Jackman.
Chocolate and Cacao Nib Gelato
Cacao nibs add crunch while a dash of cayenne adds subtle heat.

Makes about 1 quart | Freezer time about 6 hours
- 2 cups whole milk
- 3 ½ ounces dark chocolate (85 percent cacao content), broken into small pieces
- ½ cup honey
- 4 egg yolks
- ½ cup unsweetened cocoa powder
- ⅛ tsp. cayenne pepper
- ⅓ cup raw cacao nibs
- Heat the milk just until it begins to boil and turn off the heat. Place a small bowl over the warmed milk and use it as a double boiler to melt the chocolate, stirring gently but constantly as it melts.
- In a separate bowl, beat the honey and the egg yolks together until they are light yellow and creamy. Slowly stir in the warm milk, melted chocolate, cocoa powder, and cayenne.
- Chill the mixture for at least six hours, and freeze in an ice-cream maker according to the manufacturer’s directions. When the ice cream is almost set, fold in the cacao nibs.
- Transfer the gelato to a container and freeze for about an hour before serving.
This recipe originally appeared in “7 Dark Chocolate Recipes.” Photo by: Terry Brennan, Food styling by: Betsy Nelson.
Salted Nut Ice Cream
Recreate the taste and texture of your favorite ice cream with just five ingredients. All you need is a blender or food processor for this twist on a healthy treat.

Makes 3 servings | Prep time 10 minutes | Cook time 0 minutes
- 2 frozen bananas, peeled
- 2 tbs. natural almond butter
- 1 tsp. vanilla extract
- 1 tsp. coarse sea salt
- ¼ cup almonds, chopped
- Chop each frozen banana into four to six smaller pieces. Place in a or blender or food processor and blend on low to medium speed until smooth and creamy.
- Add in the almond butter, vanilla extract, and sea salt. Continue to blend until thoroughly mixed.
- Top with chopped almonds before serving.
By The Life Time Training Team
Peanut Butter Cups
Trade in the store-bought candy for this easy-to-make, healthier alternative.

Makes 12 servings | Prep time 10 minutes | Freezer time 20 minutes
For the filling
- ½ cup creamy peanut butter (or sunflower seed butter if preferred)
- 1 tbs. maple syrup
- 2 tbs. melted coconut oil
- ½ tsp. vanilla extract
- 6 tbs. coconut flour
- 1 serving of unflavored Life Time Collagen Protein Powder (optional)
For the outer chocolate layer
- 3 (3 oz.) dark chocolate bars (or 2 cups of chocolate chips) made with 85 percent or higher cocoa (select non-dairy bars or chips if desired)
- 1 tbs. coconut oil
- Melt the chocolate and coconut oil for the outer chocolate layer on the stove over low heat (you can also microwave instead if needed). Stir evenly to combine.
- Add cupcake liners to a muffin pan and using a spoon, take about half of the chocolate mixture and transfer it to fill the base of each liner. Once each liner is filled, transfer the pan to the freezer to allow the chocolate to harden (about 10 minutes) and then remove. Set the extra chocolate to the side for later.
- In a mixing bowl, stir together the peanut butter, maple syrup, coconut oil, and vanilla extract, and then gradually stir in the coconut flour and collagen (if using). Mix together as a dough.
- Divide the dough mixture evenly into 12 smaller round balls (about ¾- to 1-inch in size). Take each dough ball and flatten with fingers (so they’re about ½-inch thick). Place each one on top of the hardened chocolate.
- Pour the remaining chocolate over the top of each dough ball until it’s level. Place the pan back in the freezer for 10 more minutes to harden.
By The Life Time Training Team
Coconut Chocolate Truffles
Chocolate truffles are traditionally made with cream, butter, and egg yolks, but this simple version uses coconut milk and coconut oil. Get creative by creating different flavorings such as orange or lemon zest, cinnamon, cardamom, or add a hint of spice with a pinch of cayenne pepper.

Makes 18–24 truffles | Prep time 20 minutes, plus 2 hours cool time | Cook time 5 minutes | Freezer time about 2 hours
- 5 oz. coconut milk
- 1 tbs. coconut oil
- 1-inch piece of vanilla bean, split
- 5 ½ ounces dark chocolate (70 to 80 percent cacao content), broken into small pieces
- Cocoa powder, shredded coconut, or chopped pistachios, for decorating
- Simmer the coconut milk in a small saucepan with the coconut oil and vanilla bean for five minutes. Allow to cool for three to five minutes to allow the vanilla to flavor the milk.
- Strain the milk.
- Place the chocolate in a mixing bowl, and pour in the warm coconut milk. Stir constantly with a rubber spatula to melt and incorporate the chocolate evenly as it melts.
- When the chocolate mixture is smooth, chill the mixture in the refrigerator until set, about two hours.
- Scoop the chocolate into small balls, roll in cocoa powder, shredded coconut, or chopped pistachios, and store in the refrigerator until ready to serve.
This recipe originally appeared in “7 Dark Chocolate Recipes.” Photo by: Terry Brennan, Food styling by: Betsy Nelson.
Cocoa-Almond Truffles
Dates add a hint of sweetness to these truffles.

Makes 12 servings | Prep time 10 minutes
- 1 cup soft dates
- ¼ cup rolled oats
- 3 tbs. almond butter
- ½ tsp. vanilla extract
- 1 tbs. cocoa powder, plus 2 tbs. for coating
- Place all the ingredients (minus the coating) in a powerful blender or food processor. Blend, scraping down the sides frequently until the mixture forms a coarse purée.
- Spread the cocoa powder for coating on a large plate. Scoop out level tablespoons of the mixture, then roll into 1-inch balls and place on the plate. Roll the balls in the coating until well covered.
- Place in an airtight container and refrigerate for up to one month.
This recipe originally appeared in “Healthy Workday Snacks.” Photo by: Andrea D’Agosto; Prop Styling: Alicia Buszczak; Food Stylist: Paul Jackman.
Coconut-Cherry Almond Cookies
These yummy cookies are both gluten-free and vegan. If you’re hankering for a gooey chocolate version, substitute dark chocolate chips for the cacao nibs.

Makes 24 cookies | Prep time 30 minutes | Cook time 7 to 9 minutes
- ½ cup maple syrup
- ¼ cup coconut oil, melted
- 2 cups almond flour
- ½ cup shredded unsweetened coconut
- ½ cup cacao nibs
- ¼ cup tart dried cherries, chopped
- ½ cup sliced almonds
- ½ tsp. baking soda
- Preheat the oven to 350 degrees F. Line a baking sheet with parchment paper.
- Slowly whisk the maple syrup into the coconut oil until the mixture emulsifies. Fold in the remaining ingredients until smooth.
- Use a tablespoon to scoop the cookie dough and place 2 inches apart on the baking sheet. Press the balls to flatten slightly.
- Bake for seven to nine minutes, until the cookies are golden brown.
- Allow the cookies to cool for a few minutes on the baking sheet, then transfer to a cooling rack to cool completely.
This recipe originally appeared in “All About Almonds: Nutrition, Tips, and Recipes.” Photo by: Bob McNamara.
Coconut Macaroons
These snowball-looking macaroons are a perfect treat. Drizzle with dark chocolate if desired to make this dessert a little extra sweet.

Makes 12 servings | Prep time 10 minutes | Cook time 20 to 25 minutes
- 2 egg whites
- 2 cups unsweetened, shredded coconut
- 3 tbs. pure maple syrup
- ¼ cup canned coconut milk
- Preheat oven to 325 degrees F. Beat the eggs with an electric mixer until soft peaks form.
- Fold in the remaining ingredients.
- Form into bite-sized balls and place on a baking sheet lined with parchment paper.
- Bake for 20 to 25 minutes, or until golden brown.
Recipe by The Life Time Foundation Team
No-Bake Coconut Bites

Makes 12 cookies | Prep time 10 minutes | Freezer time 25 minutes
- 1 ½ cups shredded, unsweetened coconut
- 5 dates
- 2 tbs. coconut oil
- 12 almonds, if desired
- 1 tbs. pure vanilla extract
- ¼ cup dark chocolate chips
- Line a small cutting board with wax or parchment paper.
- Combine the coconut, vanilla extract, dates, and coconut oil in a food processor. Mix until slightly sticky, about three minutes.
- Using a tablespoon, press the mixture into the spoon to shape into 12 equal-sized bites. Gently slide out of the spoon and place on the wax or parchment paper.
- If you prefer something in taste similar to a Mounds bar, leave as is. If you prefer a taste more like Almond Joys, press one almond into the center of each coconut mound.
- Freeze for 15 minutes.
- While the coconut mounds are firming up, melt the chocolate chips in the microwave (heat in 20-second increments to prevent burning).
- Dip the coconut mounds into the chocolate to top them. Pop them back in the freezer for another 10 minutes to firm up.
This recipe originally appeared in “3 Favorite Holiday Cookies From a Life Time Dietitian.”
Chocolate-Dipped Mandarins With Pistachios
This simple-yet-decadent dessert has only three ingredients.

Makes 6 servings | Prep time 30 minutes
- 4 large Satsuma mandarin oranges, or other mandarin oranges
- ½ cup unsalted, shelled pistachios, toasted and coarsely chopped
- 4 oz. 80 percent dark chocolate, coarsely chopped
- Peel and section the mandarin oranges, gently removing the white pith with your fingers. Pat dry if necessary.
- Place the pistachios in a medium bowl. Line a serving platter with parchment paper.
- Melt the chocolate in a microwave or double boiler. To microwave, place chopped chocolate in a medium bowl and heat on high for one minute, then use a fork to stir. Repeat in 45-second increments until the chocolate is melted completely. For a double boiler, put an inch of water in a medium saucepan and bring to a boil, then reduce heat to medium-low. Place a metal or glass bowl on top of the pot and add the chopped chocolate. Stir every minute or so, until the chocolate is melted completely. Place the bowl on a folded kitchen towel on the counter.
- Dip the outer part of a mandarin slice into the chocolate and then into the pistachios, making sure it’s covered in nuts. Place on the parchment-lined serving platter. Repeat with all the sections.
- Refrigerate uncovered until the chocolate is hardened, then remove the parchment liner and place the mandarins back on the serving platter. Cover and keep in the fridge until time to serve.
This recipe originally appeared in “How to Host a Stress-Free Dinner Party.” Photo by: Andrea D’Agosto; Prop Styling: Alicia Buszczak; Food Stylist: Paul Jackman.
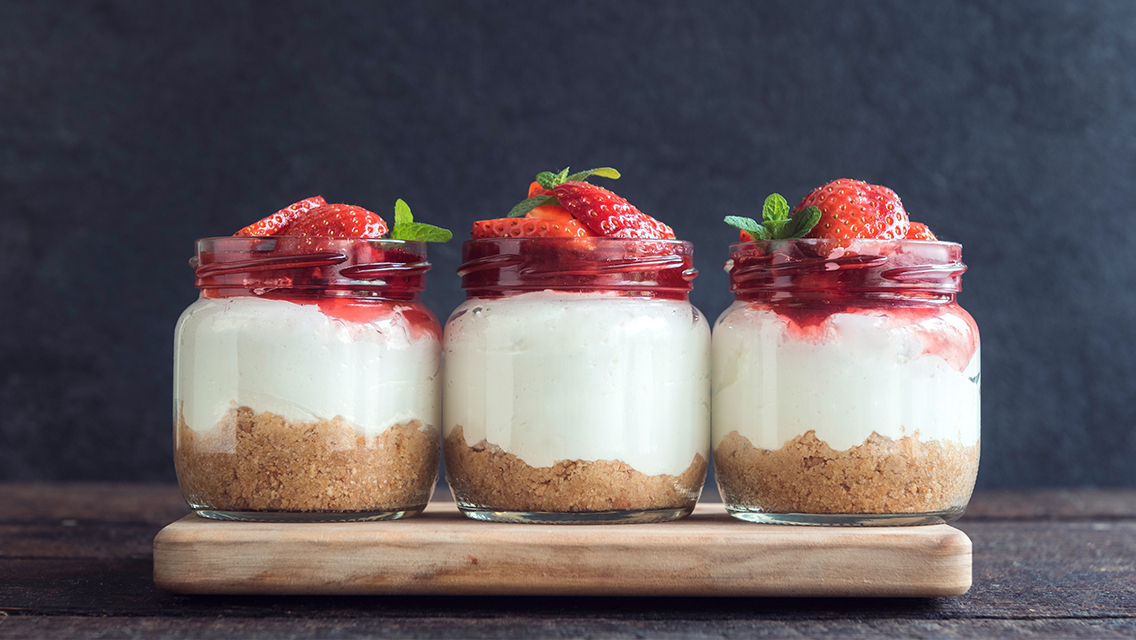
Mini Faux Cheesecakes
Dairy-free, gluten-free, and vegan in a convenient single-serve portion size — with no baking required.

Makes 12 servings | Prep time 15 minutes | Freezer time 4 hours
For the crust
- 1 cup pitted dates
- ½ cup walnuts
- ½ cup pecans
- ½ cup raw almonds
- Pinch Himalayan sea salt
(If you prefer you can use 1 ½ cups of your favorite nut.)
For the filling
- 2 cups raw cashews, soaked in water overnight and drained
- Juice of a whole lemon
- ½ cup coconut cream (or the thick cream taken off the top of a can of whole-fat coconut milk)
- ½ cup agave nectar
- ¼ cup coconut oil, melted
- Berries to taste, if desired
- Spray a muffin tin with coconut oil spray.
- In the bowl of a food processor or in a high-speed blender, combine the crust ingredients. Blend until the dough sticks together when pinched.
- Drop a tablespoon-size portion of the mixture into the muffin tin and pat down to form the crust. Place in the freezer to set while you make the filling ingredients.
- Add the filling ingredients to a clean food processor or blender and blend on low until creamy.
- Pour into the muffin tins on top of crust. If desired, lightly mash the berries and swirl into the top of the filling.
- Cover with plastic wrap and let sit in the freezer for four hours or until firm.
Recipe by The Life Time Training Team
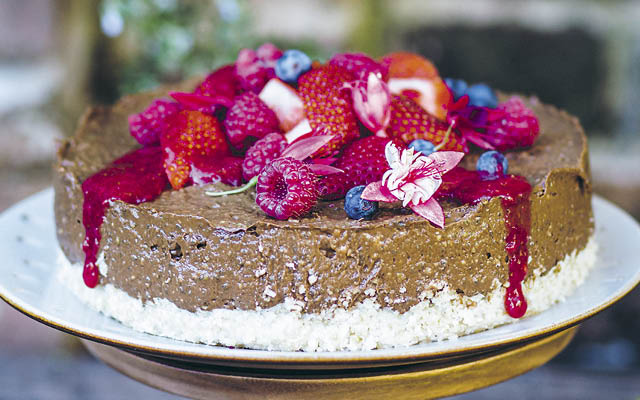
Raw Chocolate Tart With Berry Sauce
This elegant vegan dessert comes together quickly in a blender or food processor.
Makes 6 servings | Prep time 30 minutes | Refrigeration time 1 to 2 hours
Base ingredients
- 1 cup raw cashews
- 1 cup shredded coconut
- ¼ tsp. stevia powder*
- ¼ cup lemon juice
- 2 tbs. coconut butter, melted
Filling ingredients
- 6 very ripe avocados, peeled
- 1 cup almond or coconut milk
- ½ cup brown-rice syrup or liquid sweetener of choice
- ¾ cup raw cacao powder
- ½ cup chia seeds
- 3 tsp. vanilla extract
Berry sauce ingredients
- 2 ½ cups mixed berries, fresh or frozen
- 2 tbs. brown-rice syrup or liquid sweetener of choice
- 1 tsp. vanilla extract
Optional garnishes
- Fresh berries
- Edible flowers
- Mint leaves
- Lightly oil a 7-inch springform pan.
- To make the base, process the cashews and coconut in a high-speed blender or food processor until finely chopped.
- Transfer mixture to a medium bowl and stir in the remaining base ingredients. The mixture should be stiff and hold together when pressed between your fingers; add a little filtered water if necessary. Use your hands to press the mixture into the prepared tin.
- Freeze for 20 minutes to set.
- To make the filling, blend all the ingredients in a high-speed blender or food processor for 30 seconds, or until smooth and creamy. Pour filling over the set base and use a spatula to smooth the top.
- Refrigerate for one to two hours, until set.
- To make the berry sauce, process all the ingredients in a high-speed blender or food processor until smooth.
- Top the cake with the berry sauce, and serve decorated with edible flowers, fresh berries, and mint leaves if desired.
*Not a fan of stevia? Use 1 tablespoon sugar instead.
This recipe is by Lee Holmes and originally appeared here.
Honey & Vanilla Bean Crème Caramel
Fresh vanilla bean gives this crème caramel an exceptional aroma. Serve with caramelized pear slices on the side, or simply add some fresh berries.

Makes 6 servings | Cook time 45 to 50 minutes, plus 30 minutes cooling in the oven | Refrigeration time 1 hour
- ½ cup honey, plus ⅓ cup reserved
- ¼ cup pear or apple juice
- ½ vanilla bean or 1 tsp. vanilla extract
- 1 ¾ cups whole milk
- 3 whole eggs
- Pinch of sea salt
- Preheat oven to 325 degrees F.
- In a small heavy saucepan, simmer the ½ cup honey and pear juice together until caramelized, about 10 minutes. Test to see if the honey caramel is firm enough by dripping a little of it into a glass with ice water. When the honey caramel forms a firm ball, it is ready to distribute evenly into six 4-ounce custard cups or ramekins.
- Arrange the ramekins in a larger roasting pan.
- Meanwhile, split the vanilla bean lengthwise, scrape just the seeds into the milk, and warm until it begins to steam. While the milk is infusing with the vanilla bean, whisk the eggs, reserved honey and salt together until smooth.
- Gradually whisk the warm milk into the egg mixture until smooth. Divide among the caramel-lined ramekins. Pour hot water into the roasting pan until it reaches halfway up the sides of the ramekins.
- Place the pan in the oven and bake for 45 to 50 minutes, or until the custards are just set. Allow them to cool out of the oven — but still in the roasting pan — for another 30 minutes.
- Chill for at least an hour in the refrigerator before serving. To unmold, run a knife between the custard and the ramekin, then invert onto a dessert plate.
This recipe originally appeared in “Egg Essentials: Recipes, Techniques, and More.” Photo by: Terry Brennan; Food Styling by: Betsy Nelson.


Comments (3)
All of the recipes look delightful, and I can’t wait to try some of them!
Thank you for including recipes. They all sound delicious. I will definitely be trying some of them out!
There is no carb, sugar, protein, etc. data.